A Year in the Garden…Filoli in February

Filoli  is a fine example of an early 20th century country estate located in Woodside, about 30 miles south of San Francisco. The 654 acre estate is a National Trust for Historic Preservation site which was opened to the public in 1976 and features a 54,000 square foot home, more than 16,000 square feet of formal gardens, a six acre orchard and numerous marvelous open meadow and woodland spaces. They boast extensive educational offerings in horticulture, nature education, botanical art, the decorative arts, flower arranging and much more plus lecture series events and opportunities for nature hikes. Filoli is in its final year of a three year Centennial Celebration and has declared 2017 its Year of the Garden.

For the last several years they have offered an eight month horticultural certificate program called A Year in the Garden. Long on my bucket list, I declared 2017 MY year in this marvelous garden. This informative series of classes covers a broad range of topics from basic botany to water management and garden design. A huge perk for its students is that it is taught by Mimi Clarke who was a full time Filoli staff gardener for over ten years. Mimi now maintain gardens for a number of private clients but has not lost her love of Filoli and has a wealth of knowledge of the gardens and its plant material gained over her many seasons of stewardship of the grounds and its plantings.

In future posts I’ll tell you more about the history of Filoli and share with you more photos of both the home and grounds. The day of the first class meeting arrived with dark skies and a steady drizzle of rain which made both the almost 4 hour journey from my home and photography in the garden challenging.

Clad in our boots and raincoats, our group of fourteen was met in the Visitor and Education Center to be escorted behind the scenes to our classroom in the Potting Shed located near the estate’s original greenhouses. And a very nice potting shed it was…

img_5252

This lovely building was built in the last few years with funds donated by a generous Filoli benefactor and offered the perfect setting to begin our study, surrounded by the garden staff’s tools of their trade and with lovely views of both work in progress and the surrounding woodland.

Mimi Clarke gave us a short overview of the series and we all had the opportunity to introduce ourselves. Many of my fellow students characterized themselves as novice gardeners and their hopes for what they would gain from the class were as varied as their ages and hometowns. I think we’ll be a fun group and everyone will learn from each other’s experiences.  I was really excited to hear that most class days will have a nice balance of classroom work and hands on work in the garden or garden walks.

Our morning topic was part one of two lectures devoted to Basic Botany. No matter how many times I have heard these plant growth basics, I feel a little more empowered every time. So many of the decisions we make about how we choose, plant or prune individual  specimens should be based on basic knowledge of their root, stem and leaf structures and often, they are not. We just put them in the hole and hope for the best–often applying a one process fits all plants philosophy. We cut them back hoping to make them fit the size or shape we require without regard to their genetic disposition. We prune when it is convenient for us rather than the optimum time in the growth cycle of the plant. I can never hear these basics too often! I also appreciated Mimi’s concise explanation of botanic nomenclature and the importance of knowing your plants by their scientific names rather than their common or regional names. The printed material we received on botany basics and types of root, stem and leaf systems along with illustrations of leaf classifications is to the point and will be a good addition to my references.

After a quick lunch break we set out on our first garden exploration–the Landscape Tree and Shrub I.D. Walk.

As a quick diversion we first spent a few minutes learning about the literally hundreds (maybe thousands?) of potted up daffodils, tulips and foxgloves lined neatly in the yard area outside our potting shed classroom.

We learned that these pots are used not only for color in and around the patio and walkway areas of the garden but also placed in the beds to fill in gaps. Once each pot’s peak bloom has passed it is replaced with a new one whose bulbs were set in a bit later, thus extending the bloom season as long as possible. Spent daffodil bulbs are then planted in the outlying areas of the garden to provide color the next year. Spent tulip bulbs are composted as there is not enough winter chill to have them bloom from year to year in the ground.

With umbrellas up and a great handout relieving us from too much note taking Mimi led us through various parts of the property stopping at intervals to highlight trees and shrubs many of which are considered to be foundation plantings of the estate, meaning that the species was included, often in large groupings repeated throughout the grounds, in the estate’s early landscape design. Here is a small part of what we saw:

img_5258

This stately grove of Olea europaea ‘Mission’, or Mission olives, was planted around 1918 and is an original landscape feature. The Mission olive is native to California and was developed by Spanish missions in the late 1700s. The trees in winter have a soft cushion of oxalis underfoot and still bear fruit after almost 100 years!

img_5259

An allee of Plantanus x acerifolia, commonly called London plane trees, is an example of a stylized pruning technique called pollarding. If left to mature naturally, these deciduous trees would grow to 65-100 ft. tall with trunks more than 10 ft. in diameter. Pollarding produces the short, club-like branches you can clearly see in winter. As spring arrives long whips of new growth will leaf out to provide a shady canopy and a tree whose size is much more in keeping with the needs of the walkway. Growing against the building’s brick wall you can see the leafless trunks of a very large wisteria. Filoli has both Wisteria floribunda (Japanese wisteria) and Wisteria sinensis (Chinese wisteria) growing on many of its brick facades. Without a label it is impossible for me to tell which species this is until it leafs out and starts to flower. I’ll check back in on this one as the year progresses–it will be spectacular to photograph in bloom!

img_5246

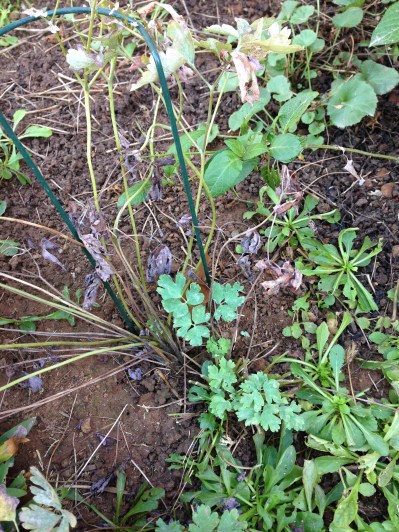
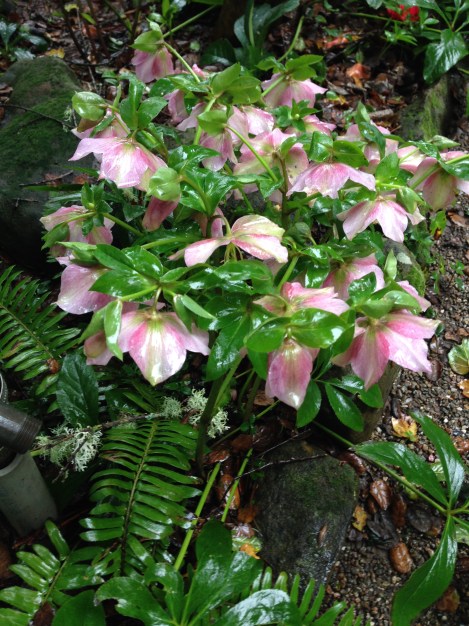
Three species of camellias are prominent in the Filoli landscape: Camellia japonica, Camellia sasanqua and Camellia reticulate. Pictured are several cultivars of sasanqua camellias. Mrs. Roth, the second owner of the estate had a particular fondness for camellias and had them shipped in from all over the world. Many cultivars of Helleborus, commonly called Lenten Rose, carpet the shaded areas under the camellias. I especially liked this one which almost appeared striped from above.

img_5276

img_5273

This amazing specimen is Ulmus glabra ‘Camperdownii’, the Camperdown Elm. This cultivar is unable to reproduce from seed and is propagated from grafts. The wide canopy and contorted pendulous branches develop slowly over time, ultimately reaching up to 30′ high and wide. This Camperdown Elm was planted in 1918. These elms are very susceptible to Dutch Elm disease and thus are rare in world today, usually found on large old estates. In the background left you can see three of  the over 200 Taxus baccata ‘Stricta’ which are planted on the property. Cuttings for these Irish Yew trees were taken from Muckross, the Irish estate of Filoli’s original owners, Mr. and Mrs. William Bourn, II.

Our semi-sogginess did not dampened our enthusiasm as we finished our walk and gathered up our belongings for the day, looking forward to our next class in March.

img_5244

Daffodils lead the way each year in Filoli’s parade of blooms. Although I saw several blooming naturalized colonies my visit was just a bit too early to see them in their full glory. The estate’s annual event, Daffodil Daydreams, spans Friday, February 24-Sunday, February 26, and will feature talks, tours, demonstrations and hands-on activities all in celebration of this beautiful bulb whose blooms signals the coming of spring. If you would like more information about this event or anything else going on at Filoli go to their website: http://www.filoli.org

Over the fence…

Each gardener works her ground for different reasons. Some love the physical labor and breathing the fresh outside air. Some enjoy seeing their planning on paper come to life.  Some use their gardens to express their creative core and reveal themselves to others who view and enjoy the resulting beauty. Some just revel in the diverse plant world God has given us with which to work.

I am probably a little bit of each of those gardeners but most of all I am a social gardener. While it is true that most of us actually labor in our physical garden space alone, with the exception of spouses or children who are conscripted into service, there is so much “gardening” that goes on in the world around us bringing each of us into contact with others whose unique gifts, knowledge and experience enrich our lives. Enthusiasm is the catalyst for the movement of ideas among individuals who might never cross the other’s path if not for their shared passion. Enthusiasm is–by its very nature–SOCIAL.

In every city I have gardened I have made friends for whom the seed of our relationship was a shared love of our gardens. Those seeds grew to sturdy plants, blossoming into relationships that grew far beyond our gardens. I think back to my thirties and Mary C. who made many garden center trips with me trying to develop a steep, dry slope into a cottage (hillside cottage?) meadow. Her plant knowledge was far superior to mine and I learned so much from her! BFF Judi H. and I have toured, shopped, planned and planted together for more than 30 years even though we have not lived in the same city since 1997. Beautiful Mary S. introduced me to the wonders of her Southern woodland landscape and a host of plants I knew but had never grown. We traveled the back roads of Georgia to nurseries far and wide, took in classes and events at the Atlanta Botanical Gardens, celebrated our successes and bemoaned our failures for a decade. Karen B., also a Georgia girl, gardens in a relaxed style we all could take lessons from–she taught me that not every garden need be weed free and groomed to be a source of pleasure to those who inhabit it. It was always a joy to drive by her home and see her in her broad brimmed hat and gloves picking blueberries or a bloom or two to fill the glass wall vases in her kitchen.

As my Central Valley garden grows in years, so have I. Now in my sixties with gardening friends in their 60s, 70s and beyond, our gardening dreams may be loftier than our knees and backs can follow through on but our enthusiasm has not waned. Ellen H. has expanded my meager knowledge of local birds and their homes in my garden. Ann D. has taught me more about trees and wildflowers than I could have hoped to learn from a book. She has a keen scientific body of knowledge and is my go-to for native plant and wildlife information. We approach with chagrin our shared inheritance of gardens not well planted nor well tended by their previous owners. We exchange knowledge, ideas and plants ‘over the fence’ just as gardeners have done for centuries.

Please enjoy a few plantings from all of my gardens which came to me over the fence from cherished gardening friends.


Parting words to gardeners ‘over the fence’ everywhere.

fullsizeoutput_97f

Succulent dreams…

Succulents are everywhere! Long a staple in the schemes of gardens in mild winter and temperate summer locales such Southern California and the San Francisco Bay area I am seeing more and more creeping into the landscapes in my  San Joaquin Valley. Even the big box home improvement stores have copious supplies practically year-round. The growing interest in low water gardening has us all looking at plants with new eyes hoping they will be just the solution to our current challenges.

Four or five years ago I toured the San Francisco Decorator Showcase home, an event  held annually to benefit the city’s University High School.  That year’s home was a gorgeous 4 story, very early 20th century mansion not far from The Presidio and overlooking the Palace of Fine Arts and the San Francisco Bay. The landing just outside the home’s very formal front door was flanked by the first examples I had seen of what we now call ‘living walls’. These horizontal facades consist of generally metal frameworks to which are attached individual plant openings made from root retaining bags or boxes. Each opening is individually planted and when the plants fill out, a solid wall of green is established. In the intervening years since this first glimpse many different systems of this kind, in all manner of sizes and materials, have been developed and are readily available to home gardeners. These particular walls were planted entirely in succulents and were preceded, as you walked up the steps, by two extremely large bowl shaped urns planted with additional succulents, mostly having very bold natural structures. I was in love! The juxtaposition of the century old limestone home with all its turn of the century ornamentation and these modern and very statement making plantings was not only fun but also gave the home an upbeat, young, fresh look. Unfortunately the photos I took did not survive the transition from Blackberry and PC to iPhone and Mac and my vivid memory of the scene cannot be inserted as media into this post! I have spent time each of the ensuing years trying to come up with just the right combination of structure and succulents to add a semblance of these pleasing points of interest to my own garden world.

Research was my first task so, of course, I bought a book to add to my gardening reference library. It was lovely reading but ever so much more academic information than I needed fullsizeoutput_97d as I could really only buy whatever succulents are locally available and most of those are labeled only with the genus name or possibly just a common name. Wherein my book had descriptions of hundreds of Echeveria, many very different from one another, my ability to narrow down the labeled Echeveria at my local Home Depot to anything more specific was pretty pitiful. I abandoned my traditional desire to plan my plantings and keep detailed records and labels of everything and reduced my hunt to the lowest common denominator. I bought the smallest pots of as many different shapes and colors variations as I could find.  Now the learning curve began!

My first attempts were in rather shallow broad dishes which I set out on the patio tables around the pool. These bowls were lovely when planted in the late spring but as the summer set in I quickly learned the difference between succulents and cacti. Almost all cacti are succulents but all succulents are definitely NOT cacti. I fried the whole lot in short order. I suppose had I actually read my book rather than just looking at the photos I would have learned that many succulents are not very tolerant of strong sun. And again the meagerness of accurate labeling weighs in to make it a challenge to determine whether what you are purchasing is a cast iron performer or prefers its sun to be filtered.

Somewhat chastened by this experience I put my sumptuous succulent planter dreams away for the season. Not to be outdone by these pesky but perky plantlets in their 3″ pots I gave it a go the next year, keeping my bowls in bright light under the covered patio and was rewarded with plants that quickly outgrew their containers.  I transferred all of them to an empty concrete fountain, left by the home’s previous owner, which had enough fine cracks in it to make it unusable as a fountain but perfectly drained as a planter. Here you see that effort:

img_0140

Upon the initial transfer of the plants into the fountain the center was quite flat and uninteresting. Several days later Dave came across a display of tall rectangular plastic pots at Costco which were preplanted with a variety of succulents and brought one home on a whim.  We pulled out the smaller plants from the fountain’s center area and literally set the entire pot into the soil about 3″ so it would be stable. Height and importance were added instantly to the planting! The plastic planter remains in place as I write this some 3+ years later–a long term bang for our $12.99. Specimens have waxed and waned in the bowl through the seasons. I break off bits and tuck them in here and there. The fountain is sited in a morning sun only area and is protected enough to have avoided most loss from freezing winter cold.

Above you see a few bits from the bowl as it looked yesterday–overall a successful venture! I planted a second unused fountain in the front garden the next year. Sited in full southern sun it has been more challenging to keep going. It has become an “only the strong survive” site. I pop in a few new little pots each fall to give them the best chance of settling in and then it is up to them to hang on.  A couple of specimens have flourished in that area of searing sun, including this very structural pencil like selection and the pebble shaped blue green mat in the foreground. Sooner or later I’ll hit upon just the right ones to acclimate to the spot but it clearly is not happening in an organized fashion. You live–you stay, you die–oh, well!

img_5176

Because the ground freezes in the winter, local gardeners striving to maintain broad swathes of interesting succulents planted in the ground rather than pots face more challenges than our lucky gardening friends further south and in the more temperate Bay Area. Specimens need to be identified which can tolerate the proposed site in terms of summer sun and winter cold. I know I’ll be seeing many fine examples of these gardens as I travel south for the spring tours and I’ll post as many photos as I can. Let me tease you with a bit of the front garden pictured below. These photos were taken in Pasadena the first week of December. The low slung historic Spanish bungalow is a charming backdrop for a front garden chock full of mature succulent specimens and other unthirsty selections. Its charm was equal to any white picket fenced English garden I’ve seen.

2017–Best garden year yet!

I have been writing this encouragement on the January page of my calendar for more years than I can remember! Gardeners are by nature hopeful people with full faith that each new year will bring them garden miracles in abundance. This will be the year my soil, after many seasons of amending and turning over, will reach its peak friability and provide all the nutrients my plants require to perform their best. This will be the year perennial selections added in the last couple of seasons, having slept a year and crept a year, will leap with abandon. This will be the year the aphids will find my neighbors’ crape myrtles more hospitable than mine. This will be the year of a world wide snail and slug extinction event…

img_5164

For the first time since Thanksgiving I have spent a bit of time in my garden assessing what needs to be done and reflecting on changes I would like to make this year. We have had an incredibly wet and quite cold last 6 weeks. At this midpoint mark in January we have had almost 10″ of rain since October with over 4″ of that in the last 2 weeks. These numbers will not sound like much to gardeners in other parts of the country but here in the Central Valley of California our average annual rainfall (July 1-June 30 being our rain year) rarely exceeds 11″. We are in a historic 6 year drought in an area whose best rain years would constitute emergency conditions for residents in states blessed with naturally wetter weather. We have prayed for rain and now, of course, don’t know what to do with all this water!

Don’t misunderstand me–I am excited to have the low areas of my dormant lawn look vaguely like weedy duck ponds. The water will eventually soak in and give me a little better start when the heat comes. What we really need is more snowfall in the upper elevations of the Rocky and Sierra Mountains. The spring melt of the mountain snowpack is the source of most of the water which fills the California  reservoirs and carries us through the summer–many parts of this state receive zero rainfall from May through October. So it is more than likely that even this very wet winter will not change any of our water restrictions, residential or agricultural, and we will continue learning how to live in this new normal world of lawn free landscapes and unthirsty plantings. Of the 4 areas from which we removed lawn in 2016 two have been replanted and are prospering, one remains untouched and has a lovely covering of bright green winter annual weeds and the last is about 3/4 renovated. We were only about 5 feet from having all the tilling and amending done on that bed when my sweet Dave got out his big, bad axe to remove an especially large root adjacent to the driveway. Unfortunately there was a labyrinth of unseen sprinkler pipe under the root and well…you know the rest of the story. When the water finally drains out of the very large trench he had to dig to make the repair we will be back on the road to completion–look for pics of this very large bed in a future post.

So everything looked pretty much as I would expect at this time of year. It’s time to start pruning the roses. The weeping standard ‘Renae’ roses in the front are so top heavy I fear they may crack at their grafts and the climbers on the pavilion trellis have gone mad! My roses have always been incredibly forgiving and even in years when I feel as though I have just hacked at them they have rewarded me with wonderful bloom seasons–maybe they are ever hopeful that they will get a new gardener who knows what she is doing!

img_5158

This time last year one of my planned changes was to remove this row of Prunus laurocerasus, common cherry laurels, which grow behind the pavilion in a very narrow bed up against our side fence. These fast growing evergreens are prolific reseeders and have to be constantly pruned to keep them out of the canopy of mature Bradford pears growing on the other side of the fence. I only got as far as cutting them down to bare trunks last spring. Even these plants have forgiven me and offered me another chance to decide in their favor. Hmmm…

img_5161

Through heat, drought, rain and wind this rosemary soldiers on. It looks exactly the same now as it did in 110 degree weather with no water last July. The tag on this warrior said Rosmarinus officinalis ‘Prostratus’, commonly know as creeping or prostrate rosemary. Last summer I cut it back by half and it did not even blink. It is about waist high now and clearly not prostrate. In the ground now for almost 6 years and yet to produce even a single  blue flower. I am hoping that 2017 will be its year!

I’ll continue to keep you updated on what is happening in my garden and I have many fun garden road trips planned that you are invited to come along with me through posts and photos. The Mary Lou Heard Garden Tour in Southern California is back on my calendar this year after a few years absence. I also hope to do at least 3 of the Garden Conservancy’s Open Days this year: LA, Marin County and San Jose. I am looking forward to seeing the offerings on this year’s Gamble Garden Spring Tour. I am very excited to be participating in the Garden Bloggers Fling being held in the Washington DC/Virginia area in late June. I will have the opportunity to tour a number of public and private gardens over several days and get to meet garden bloggers from all parts of the country. I also hope to bring all of you along to a series of classes I am taking at Filoli in Woodside. If you are unfamiliar with Filoli now is the time to check them out at http://www.filoli.org –you will be amazed. There are 16 acres of formal gardens as part of a large country estate established in the early 20th century, a lovely historic home and a full schedule of garden events and education. I will participate in their A Year in the Garden program which includes classroom instruction and hands on experiences in a wide range of horticultural topics. It is always fun to meet gardeners from other areas–no matter the differences in climate or growing conditions we all speak the same language of excitement, enthusiasm and hope that THIS will be our garden’s best year yet!

img_5155
Every winter’s enduring promise–the Hellebores are almost open!

No calendar needed…

…to know that it is Thanksgiving week! Every year my tall bearded iris ‘Frequent Flyer’ bursts back into bloom to mark the season.

IMG_5058

‘Frequent Flyer’ has been touted as one of the best repeat-blooming Iris germanica for mild winter gardens. Introduced in 1994, this pure white selection has beards tipped with lemon yellow and is wonderfully fragrant.


IMG_5057

A single division from my front garden colony was transplanted in this sweet spot in the back garden in the fall of 2014–too many stalks and buds to count two years later!

IS IT HAPPINESS THAT MAKES US THANKFUL,

OR IS IT THANKFULLNESS THAT MAKES US HAPPY?


A plant in need of PR…

There are few genera of plants whose ‘thug’ species are reviled by the ornamental gardening world to the extent that their far less common but far more polite cousins are virtually overlooked. Every gardener, even ones who just mow their lawns and take a glance at their beds and borders now and then, knows the highly invasive and almost impossible to eradicate weed called oxalis. Oxalis corniculata is also referred to as  yellow oxalis, yellow wood sorrel or possibly four letter words of your choice; truly for most of us just the word oxalis says it all. This perennial menace thrives in sun and shade all over the western states (and beyond, I’m sure!) Its small 5 petaled yellow blooms are followed by elongated seed pods which can propel seeds up to 6 feet. Once the seeds germinate, forming a shallow taproot, a knitted network of roots quickly develops and it is on the move. For every one you hand pull, hundreds of seeds are dispersed in the process. Along with its partner in crime–spotted spurge–it is one of few weeds which merit herbicides especially made for its control.

Several years ago we started to see highly decorative oxalis species, mostly from South Africa and Mexico, more prominently in the retail trade. The shamrock plants sold in March for St. Patrick’s Day and the so-called Candy Cane plant seen around Christmas time are examples of oxalis which have found a niche on the plant scene and are primarily left in their pots probably due to unease about invasiveness. I have more than once pulled myself away from the gorgeous maroon foliage of Oxalis triangularis not quite believing the claim that it remains quite compact.

And so…it was truly a leap of faith for me to purchase a little 3″ pot of Oxalis hirta a few  years ago on a plant shopping trip to Southern California. Even having read its Sunset Western Garden Book description which painted a picture of restraint my little one spent its first full year in a pot! Oxalis hirta, native to South Africa, emerges in the late fall from small bulbs. Short stalks shoot up and feathery green leaves follow. Literature describes these stalks as about a foot tall but mine never top 6-8″. A bright rose pink flower eventually tops each stalk.

IMG_5051

Gaining a small measure of confidence that this pretty baby was not the kudzu of the west in disguise, I transplanted several handful of the diminutive bulbs into beds here and there. I passed on a few to a friend who, being no gardening fool, raised her eyebrows when I told her they were from the genus oxalis and promptly planted them in a pot on her patio for safety’s sake.

Oxalis hirta will continue flowering until heat sets in again and then the colony goes dormant for the summer.  This makes it a perfect little bulb to have planted among other plants which die back in the winter. They are a fun surprise in the garden when all else is shutting down for the season. Although the bulbs do naturalize, the colonies are very tight. Below you see the first few coming up on the left in an area covered through the summer with Geranium h. ‘Tiny Monster’. A second colony (seen on the right) will eventually be covered by low Cistus (Rockrose) that was planted to mask the bare legs of the background roses. I will spade these out in 2017 as they start their summer’s rest and move them forward in the bed.

The whorled flower buds seen below in the side view of this colony are your horticultural clue to this plant’s membership in the oxalis family.

IMG_5047


I see this little gem as a plant in need of a PR professional and a Facebook page. At the very least it needs a common name which eventually might allow folks to forget that it is an oxalis and give it a chance!

The other yuletide…

I have written in other posts about the great love of camellias I developed during the almost dozen years I lived in Georgia. The neighborhood in which I lived started developing in the 1920s as a sort of suburban alternative to downtown living. Although only a mile or so from downtown it was on the other side of the river–literally–and removed from the business hustle and bustle.  Homes on large wooded lots (some up to 5 acres but most in the 3/4 to 1-1/2 acre range) were built through the next several decades resulting in a residential area with many unique homes of varying architectural styles and surrounding grounds both formally and informally landscaped. In the 40s and 50s the Shirley Hills neighborhood was home to many serious horticultural hobbyists and a few homes still have the large glass greenhouses which marked that era. Camellia breeding was very popular during this time and the legacy of that pursuit remains today in hundreds of mature camellias, many 15+ feet in height. It is not uncommon to see very large plants which have a variety of grafts, dating from decades ago, producing a number of different cultivars of different flower color and form. The wide variety of camellias grown results in a very long bloom season starting in October (earliest blooming Camellia sasanqua varieties) through April (latest blooming Camellia japonica varieties) and offering a riot of pink, reds and whites along with striped and mottled blossoms.

An early blooming favorite in Shirley Hills, just as it is in the Central Valley of California, is Camellia sasanqua ‘Yuletide’. As a side note: in Georgia only Camellia japonica are commonly referred to as camellias–pronounced “ca-may-ya”. Camellia sasanqua, which often bloom earlier, have smaller leaves and less showy flowers, are simply called sasanquas. ‘Yuletide’ is an upright shrub with small dark green leaves and medium sized single coral red flowers sporting bright yellow stamens. Its name implies that it will be blooming at Christmas time although mine always came into bloom by late October and typically were finished by mid December.

Last year I added a Camellia sasanqua to a small partially shaded area visible from our back patio. My other 12 in ground camellias grow in a narrow side bed along our western property line.  We attach shade cloth panels from the roof to the fence during the hottest months to prevent them from burning. While they grow very successfully there and bloom profusely in February, March and April they are only visible from windows in our hall bath and master bedroom! In my quest for a smaller scale fall/winter bloomer to fill this shady spot with some color I found the other ‘Yuletide’ and this little darling has just started to come into bloom.

This is Camellia sasanqua ‘MonDel’ which is being grown and sold by Monrovia Nurseries under the name ‘Pink-A-Boo’. ‘Pink-A-Boo’ is a sport of the Yuletide camellia. The term sport refers to a naturally occurring genetic mutation of a plant. ‘Pink-A-Boo’ is indistinguishable to the eye from ‘Yuletide’ with the exception of its clear medium pink flower color. A sport  may produce a plant with  mottled foliage or flowers,  leaf color different from its parent or flowers sized or carried differently. The key is that the new characteristic has not been engineered by man but by nature. Sports are eagerly anticipated  by gardeners–who wouldn’t want to have the only plant of its kind? To be a success commercially a sport must be able to hand down its unique traits to its offspring.

I love the way these blooms open! The half open bowl shape is just as attractive as the fully opened flower and the bloom’s fragrance is equal to if not more lovely than ‘Yuletide’. I try to clip a few blooms every few days to float in a bowl in my kitchen. This tidy camellia would make a lovely hedge or espalier with its glossy dark green leaves all year and the bonus of the blooms in early winter!

Keep your eye on the crown…

The crown of a plant is where the roots join the stem. Most plants grow best when the crown is planted just at the soil level.  There are plants which prefer to sit a few inches below the soil level such as the clematis and plants which prefer to be a bit above the soil as they are particularly susceptible to rot in damp conditions.

Many herbaceous perennials grow by forming multiple stems/leaves around the base (crown) of the plant. Examples of this growth habit can be seen on shasta daisies, hostas, rudbeckias and asters. Throughout the growing season and especially as we head into the fall; what’s going on at the crown tells you when to get out your clippers!

Perennials have very specific growth cycles throughout their season unlike annuals. Annuals typically are almost ready to bloom when you put them in and bloom continuously until they are replaced with new ones for the next season. As perennials live in your garden year-round they need a rest every now and then. That rest doesn’t necessarily coincide with the change of season. Throughout the spring, summer and fall periodic deadheading of the flowers and trimming back of foliage can encourage new growth and perhaps more bloom periods. This is especially true in mild winter regions like mine where perennials aren’t automatically forced into dormancy by freezing cold or snow.

New growth at the crown of herbaceous perennials is your signal that it is time to trim back existing foliage and flowers, freeing up all the plant’s energy to put on new leaves, stems and flowers. In my garden the asters are perfect examples of this principal. While traditionally a fall flowering species, my asters pop their heads up in early spring and are huge sprawling masses by mid summer. They get tired looking and sometimes a bit bug eaten and, as their growth habit is to continue to branch out layering each new flowering stem at the last set of flowers, an individual stem may be 4-6 feet long but only blooming toward the tips. Remember this photo from earlier in the year:

IMG_3983

This single plant ends up laying all over whatever is underneath it and the huge rock behind it. I gather up the stems periodically to take a peek ant the base of the plant.  When  a flurry of new foliage at the crown has begun to show I know it is time to cut back the older stems, flowers and all. It is often heart wrenching! About 3 weeks ago I headed the whole plant back-clipping off each stem individually rather than just grabbing at the base and whacking (my usual M.O.) in hopes of not damaging the new basal growth. Below you see the same plant with a nice healthy basal clump and several new long flowering stems starting the whole cycle again.

img_5012

The columbine at the front of the long shade bed provides another example. I am not sure I have showed you Aquilegia x cerulean ‘Origami Blue and White’ before so here’s a look at early spring:

These sweet girls not only regrow from the same crown yearly but also throw a good bit of seed so when the original plants finally die out I have plenty of others to move around! They tend toward mildew on their foliage as the fall approaches. The spent foliage will fall to one side a bit and in the upper part of the photo you can just see the new leaves emerging from the crown:

img_5017

The oldest of the leaves will all pull off easily revealing the new foliage. These are early spring bloomers for me so I will not have encouraged any new flowers by removing the oldest foliage but they will be a bit tidied up while they rest.

img_5008

Just like everything in nature–one size does not fit all here! Only mild to temperate winter gardeners will want to use these techniques this late in the year. Gardeners with freezing winters, with or without snow, do not want to push any new growth so close to winter and generally leave on the stems of herbaceous and woody perennials to protect the crown from rot–doing their major clean up in spring.

Our mild fall continues and a few things in the garden are thinking it is spring! I have narcissus leaves a foot tall and these fun things are blooming:

2016 Salvia update…

As I write today it is a cool 64 degrees with overcast skies.  We have had several lovely days as the result of a “Pacific trough”, whatever that is. Our temps will climb as the week progresses but I think we have hope of an actual transition to fall with nothing in the forecast over 88 degrees!

Last week I shared a little of my annual autumn reset routine for my garden. In addition to the cleaning up and cutting back I like to take stock of how the new plants to the garden have done through their first summer. I added many new salvias in the early spring, some of which I shared photos in my May 26th post. Although some have been less successful than others I lost only one for which there was no hope of return. I planted a leafy and flower filled Salvia ‘Heatwave Brilliance’ in a sunny spot near a large south facing rock to add a bit of color to an otherwise fairly sterile area. The snail social media must have blown up with the news–I can envision the Twitter handle @newfood! just lighting up the screens on all their teeny, tiny smartphones. The NEXT DAY I went out to poke in its newly made label and the foot tall and wide plant had been reduced to 6 or 8 totally naked stems and even those stems had been chewed down…OMG. This casualty was the only salvia snail activity I saw all summer. I could almost see a little banner declaring Go Big or Go Home! waving over the wretched remains of a plant so recently set that my trowel was still  pushed into the ground next to it.

The new salvias were planted in areas ranging from morning sun/afternoon partial shade  to  full day southern sun. Limited water was in play for all but clearly those planted in the baking sun had consistently drier soil.

img_4958

In this photo there are four salvias from foreground to background: Salvia greggii ‘Raspberry’, Salvia microphylla ‘La Trinidad Pink’, Salvia ‘Heatwave Blaze’ and Salvia ‘Heatwave Glare’. You can barely see ‘Heatwave Glare’ (white) at the edge of the picture. This bed has morning sun until about noon and then is gradually shaded by the house as the sun moves to the west. The foliage is still fresh and green and they are fairly compact. While none of them is covered with flowers, the flowers are quite lovely both from a wide view and close up. I do have ‘Heatwave Blaze’ staked with a low half hoop just behind the edging as anything that might stray into the field of the string trimmer is doomed. Can’t say much for the lawn, can you? Here’s a little closer view of ‘Heatwave Glare’ and ‘Heatwave Blaze’.

This bed, which curves around into a more sunny area, also contains several varieties of campanula and hardy geranium, dianthus, cuphea, hellebores, calla lilies, penstemon, iris and roses has been a great success this year with a nice succession of flowering from spring until now.

img_4967

In sharp contrast, this bed sits just in front of the shade canopy of a large sequoia and is in full southern sun all day. There are four salvias in the bed although only 3 are visible in the photo. Left to right they are: Salvia x jamensis ‘Shell Dancer’, Salvia microphylla ‘Ultra Violet’ and Salvia ‘Heatwave Glimmer’. ‘Shell Dancer’ is quite tall with lovely bicolor flowers. ‘Ultra Violet’ is a naturally shorter cultivar at about 12″-18″.  All three are leggy and look pretty beaten down. They will definitely get their trimming back to see if I can stimulate some fresh new growth and blooms in this slightly cooler weather.

I have long believed that many plants recommended for full sun cannot withstand our Central Valley scorching summer afternoons so it would be an easy leap to think that based on my garden these salvias will not meet my needs for full sun perennials. All of these featured today are from the greggii-microphylla complex of salvias which are native to the dry deserts of Mexico and have proven adaptability to harsh climates. I think the word ‘adaptable’ is key here. My morning sun/afternoon partial shade bed probably is closer to the greenhouse/commercial nursery conditions in which they were propagated and grown than to their native habitat. It is also important to remember whenever you add plants which are characterized as waterwise or drought tolerant that usually the words ‘when established’ are included. I’m willing to wait them out for one or two more seasons in hopes their performance in the full sun and drier areas will improve with time as they become acclimated to their planting locations.

These two are in conditions about midway between protected and extreme and have done nicely. On the left is Salvia ‘Fancy Dancer’ and to its right is Salvia greggii ‘Dark Dancer’. ‘Fancy Dancer’ sports the same bicolor pink blooms as ‘Shell Dancer’ but on a more compact plant. ‘Dark Dancer’ is quite tall at about 30″ and is uncharacteristically unfloppy for a salvia that tall. Is unfloppy a word?

img_4991

Salvia ‘Mystic Blue Spires’ has been a winner for a first year plant! At about 24″ tall and wide this single plant has bloomed continuously since I dug it in. I have deadheaded the flowers as they faded but done no trimming of the plant otherwise.  Wilt on the hot days has been minimal considering it has had barely 4 months to establish its root system.  It is a bee, butterfly and hummingbird magnet. I love the bold color and plan to add a few more of these if I can find them this fall.

While not new in 2016 these two deserve a mention. Salvia melissodora, often called Grape Scented Sage, on the left is one that garden literature deems “challenging to grow outside its native habitat of Northern Mexico.” I planted a 4″ pot in an area of the garden we commonly refer to as the ‘death zone’–hot, hot, hot and dry, dry, dry. The little guy struggled for the first year then started to settle in gradually over the last 2. I now have a lovely 4′ plant which blooms sporadically throughout the year. The pale lavender clusters of grape scented blossoms are not spectacular but the plants soft green foliage looks pretty  good year around and will provide a nice backdrop if I can ever get anything else to grow in its corner of doom. On the right is an little guy with huge pink blooms (in relation to the plant’s overall size) which was an unmarked nursery find last fall. Its foliage indicates it is probably from that greggii-microphylla complex. It is encouraging that after a winter to settle in it looks much better than its newly planted cousins sharing a similarly hot southern exposure.

img_4986

I’ll close with this snap of a bud forming on one of the Salvia ‘Coral Nymph’ plants which have been so popular with the bees and hummers this year. This cultivar is usually sold as an annual though I have had some winter over successfully each year. As I was photographing other salvias for this post I noticed the bud color variegation, then quickly saw that all the buds were similar. I have grown this cultivar for over 20 years and never noticed the interesting bud. Sometimes we spend our garden hours looking at the big picture, creating  swathes of color, designing vignettes of foliage with contrasting color or texture or arranging plants to provide views at varying heights and forget to look closely at the very plants we are using. This bud reminded me to spend a little more time getting to know the amazing details that nature provides us if we just look closely enough.