Spring renewal…

Gardening friends…this post was actually written on the day before my March Filoli visit and so I held it for the weekend.

A valuable garden strategy I have adopted is to have at least a few areas where minimal care is needed to keep them looking good so that I have the time and energy to garden more intensively in other areas. As a general statement, beds filled with evergreen or deciduous blooming shrubs and ground cover require less time on your knees than those filled with roses, perennials and annuals! As I have matured as a gardener I have much more appreciation for flowering shrubs than I did when I had to have every new perennial that caught my eye. There is a quiet grace about a grouping of viburnum, gardenias or rhaphiolepis which just reward you every year with their leaves and  blooms and demand little from you in return.

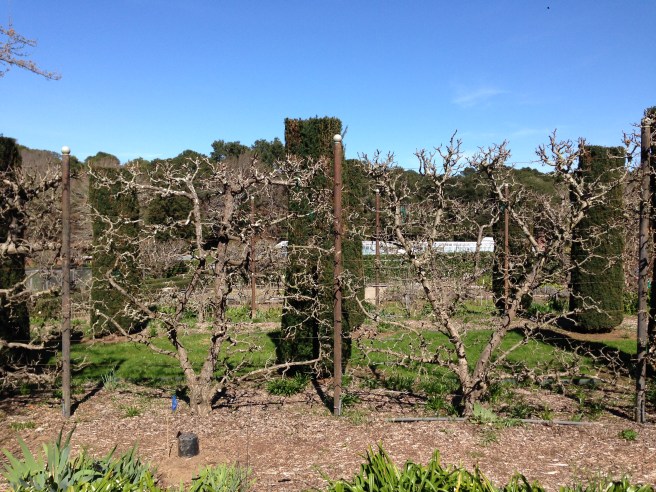
One such autopilot garden area for me runs for about 40 feet along the western fence of my back yard. At the far north end sits our pool equipment which is surround by a screening hedge of glossy privet–almost my least favorite plant but fulfilling its purpose with only one or two clippings a year. A relatively young coast redwood (Sequoia sempervirens) snuggles up to the privet giving some vertical interest to the fence line. Also original to the landscape are four Podocarpus macrophyllus flanked by pink flowering Indian hawthorn (Rhaphiolepis indica.) When we purchase the home in 2008 the south end was anchored by a Photinia x fraseri tree, commonly called a redtip, which succumbed to the fungal disease Entomosporium maculatum shortly after. Rather than digging out the quite large dead tree we pruned back the smaller branches and its trunk now acts as support for a climbing ‘Fourth of July’ rose which I featured in a post last spring. As the years have gone by we have been blessed with a lovely borrowed landscape backdrop provided by our neighbor’s 2 pineapple guava trees (Feijoa)–these barely peeked over the fence in 2008. Other than the climbing rose, our only two additions to this bed have been three Abelia x grandiflora ‘Kaleidoscope’ in front of the podocarpus and a few Cuphea hyssiopifolia ‘Lavendar Lace’. Every year all of this gets a little nip or tuck here and there to neaten things up–only the cuphea have gotten a consistent yearly hard cutting back.

So here we are 8 years later and the removal of a couple of low hanging sequoia branches has shed light on how out of shape things have gotten. This area is the antithesis of the squeaky wheel and thus is always last on my to do list. Most of the Indian hawthorns are in total shade under the sequoia and have not bloomed in years. All of the podocarpus are locked in a death battle with the over the fence trees and although the abelia look fine on the outside, close inspection reveals their interiors to be masses of leafless twigs and I reflect that I haven’t seen these bloom in recent years either.

Abelia x grandiflora is a semi-evergreen to evergreen serviceable shrub which does well in both sun and shade with minimal care. Its white to pale pink tubular flowers open on new growth starting in the late spring. The heaviest bloom is May through early fall but in temperate winter areas like mine some flowers can persist all year. Plants are evergreen in milder winter areas and half hardy in colder climates. The species can grow quite large, often to 6 ft. tall and wide. Many relatively new cultivars have been bred for both more compact size and for variation in leaf coloration. I chose the the cultivar ‘Kaleidoscope’  for its leaves with yellow gold margins and green centers which turn rose pink in cooler weather. Of note is that the coloration is somewhat dependent on sun. In the photo below you can see that the leaves on the lower part of one of the plants which was hidden underneath its neighbor are bright, clear green rather than the yellow for which this variety is known. Its 3 ft. height and similar spread make it well suited to smaller gardens.

The preferred pruning strategy for these plants to keep their open, arching shape is to prune selected branches to the ground yearly, encouraging new growth which will flower. Shearing is not recommended. That window has long closed for my plants as I can’t even get my hand through the bramble of central twigs to trace any single branch to the ground! Fortunately abelia are receptive to what gardeners call renewal pruning or renovation pruning. This is a well orchestrated take no prisoners and leave very few men standing pruning technique of the gardening world. In the picture below I have made an initial pass at about half of the first plant of the three.

IMG_5383

The little cupheas in the foreground get a haircut at the same time! The twiggyness of the interiors of the abelia was amazing. A bonus was finally locating the source for some pesky bermuda grass which had been growing up through the abelia for a few years.

IMG_5387

After several hours of clipper work the three abelias are reduced to about 8-10″ tall. Clearing all the old top growth reveals that the one on the far right is now practically under a mature Indian hawthorne which has tripled in size from 2008.

IMG_5393

If these had been selectively pruned yearly at least a little over the last 5 years or so, I should have seen a good amount of new season’s growth from the base of each plant. In fact, I saw only 4 new shoots–3 on the middle plant and one on the far right plant. You can see in the photo below the new growth is dark green brown in contrast to the tan of the old branches and this intrepid shoot was struggling its way to the sun!

IMG_5391

There is perhaps a bit more work to do on these. I think even more of the smaller twigs could be cut to the ground but as renewal pruning is pretty drastic in itself I think I’ll leave it at this for now. Once I see new growth emerging from the base and whether the existing branches start to put on new leaf buds, I’ll make the call on more cuts. I’ll let you know how they do down the road!

P.S. Well, after my Filoli pruning afternoon I know that I was doing a lot of things right: My shrub was identified and I knew its natural growth and flowering habit including its recommended pruning technique and I knew my purpose was to encourage new growth which would produce more flowers. I believe now I did not go far enough in eliminating much of the existing twiggy growth (30-50%) from the crown. I will go back and take out more and see how the plant responds. Stay tuned and I’ll share a follow up picture in 2-3 weeks.

A Year in the Garden…Filoli in March

It would prove to be a gorgeous spring day at both my home and at Filoli–some 170 miles away. The day still started very early for me but the drive was uneventful and I even arrived early enough to wander and take a few pictures before class started at 10:30 am.

Part II of Botany for Horticulturists was today’s morning session. Last month in Part I we got familiar with botanical nomenclature and explored plant structure including roots, stems and leaves. Now we would delve further inside the plant, learning the intricate parts of the flower which facilitate reproduction and about the functions that drive plant development: photosynthesis, respiration and transpiration. While none of this was new to me, I am definitely not a botanist, even self-taught, and I appreciated both instructor Mimi Clarke’s lecture and the great reference sheets she included in our class notebooks. After a bit of book work she gave each of us a hand lens and we worked our way through dissecting one of Filoli’s famous daffodils–it was amazing to see the developing seeds deep down inside the ovary wall!

After a fast bite to eat at the garden staff’s outdoor lunch area we gathered again for our afternoon garden walk which was to focus on general pruning principles. The first and really only principle started with making the decision to prune. If your plant doesn’t require pruning to improve plant health, develop branching structures, enhance flower or fruit production, control growth, alter the natural growth to train it into an artificial form or reinvigorate it after years of improper pruning–put your tool away. There is no pruning just for pruning’s sake. There is no pruning everything in winter just because it looks like it is dormant and it is easier to get it all done at once.

Mimi’s standard outfit this time of year includes her bypass pruning shears in the sheath on her belt and her folding curved pruning saw tucked into her back pocket. She uses the pruning saw in circumstances that I would have chosen loppers. She explained that loppers are fine for rougher cuts but as they tend to cause the branch to split, she chooses the small saw for finish cuts. Point taken–I am going to find my folding saw (I may actually have 2) as soon as I get home!

We spent the next couple of hours moving from place to place in the garden as Mimi walked us through what we need to know BEFORE we prune. I have taken many pruning workshops but this was the first time an instructor taught the skill as an exercise in deductive reasoning rather than specific rules for specific plants. I loved it!! There are no pruning free rides–as gardeners we must do the homework first before we get the tools out.

As Mimi wrote in her handout “5 Things to Know Before you Lay Steel to Wood:”

Know what plant you are dealing with–you’d think this is a no-brainer but maybe not!

Know the plant’s flowering habit–does it bloom on the current season’s growth or on the previous season’s growth (new wood or old wood?) Spring flowering shrubs generally bloom on last year’s growth and are pruned soon after they have finished blooming. Pruning them in late summer or winter will remove the developing flower buds (still unseen) and drastically reduce spring flowering. Most summer flowering shrubs bloom on new wood and can be pruned in late winter or early spring to encourage the new growth which will produce the flowers. These guidelines are not without exception so we must do our research first.

Know the natural growth habit–what is this plant supposed to look like? Is it tall and skinny or short and mounding? Are the branches arching and fountain like or stiff and vase shaped? Where is the most vigorous growth found–shoots arising from the crown or at the branch tips? Is the plant you are trying to evaluate for pruning the right plant for the space and conditions in which it is planted?

Know the plant’s ability to resprout from old wood–not every plant can recover from serious pruning down into old wood. Mimi cited the example of old and woody rosemary as a plant which usually will need to be replaced once it gets badly out of shape.

Know what you would like your end result to look like–is your desired result appropriate for the plant and for the site? I have seen more ligustrum trimmed into 2 ft. high cubes than I ever care to admit. This question goes hand in hand with knowing what your plant’s NATURAL growth habit.

fullsizeoutput_9ab

Our first example was a very long row of quince which are being trained into a hedge. We worked the steps: the plant was properly identified; we determined it was a spring bloomer and blooms on old wood; we learned its natural growth habit is to push vigorous new shoots up from the base of the plant in addition to adding growth at the tips and that its normal habit is open and airy with long arching branches. As the plants are being trained into a hedge and are in bloom now the pruning prescription included waiting until after the bulk of the bloom is gone, removing about 30-50% of the branches from the crown to encourage new shoots from the crown, making heading cuts about a foot or so lower than the desired hedge height which will promote lateral growth from the side buds to fill in the hedge and thinning out some existing lateral growth that is crossing or too crowded. Toward the end of the hedge row a lone quince which may have lost its neighbor connecting it to the hedge gave us a peek at how an individual specimen would look.

IMG_5458

We moved on to the Gentleman’s Orchard where fruit trees of all kinds can be found. Several people in our group have home orchards and Mimi spent some time talking about training young trees and the importance, again, of doing your research to know your tree’s  natural habits and optimum fruiting conditions. This topic could have been a whole day’s class on its own. On the border of the orchard there is a fabulous row of very old espaliered fruit trees.

IMG_5463

Although hard to tell by the photos these trees are very old and probably close to 16 ft. tall! I was interested to see that the trees were not all the same fruit. I saw both Apple ‘Gravenstein’ and Pear ‘Louise Bonne d’avranches’ and I only looked at a few tags. This stop gave Mimi a chance to talk about how the specialized art of pruning to espalier is a valuable tool to have fruit production in small spaces in addition to an aesthetically pleasing garden focal feature.

IMG_5467

As we passed out of the orchard and into the more formal parts of the garden it was wonderful to see that I had not totally missed the spectacular show of naturalized daffodils for which Filoli is renowned!

IMG_5468

We stopped in to check on this grouping of Hydrangea macrophylla that had been as yet untouched on last month’s walk. Their pruning had been completed and again we walked through “our things to know before pruning” in an effort to apply them to the work that had been done.

The afternoon was growing short so as we walked back to our potting shed classroom we went over again the 4 basic pruning methods, all of which had been observed at one point or another on our walk:

Pinching–pinching back with your fingers the terminal (end) growth to produce dense, twiggy growth and induce flowering

Thinning–best used with shrubs that sprout from the base as well as the branch tips and opens up structure by removing unproductive, vegetative growth or growth that detracts form

Heading Back–removing growth back to existing structure (previous cuts) thus producing additional dense top growth, used in concert with thinning

Shearing–removing all new growth without regard to whether you are cutting branches or leaves, use only on hedges and even then know that eventually you will have a bare twiggy inside with green only on the outside where you have cut

As long as this post has been I cannot leave you without sharing some of what was blooming at Filoli. There are still many potted daffodils and the potted tulips and their friends are clamoring for attention also. And so much more…take a break now if you are tired of reading but make sure you come back for the photos below!

Amazing displays of potted bulbs near the Visitors Center…

 The house in its spring glory…

IMG_5418

And all around the grounds…

fullsizeoutput_9ad

Forget-me-nots, Myosotis, have naturalized everywhere and have made especially large colonies in the shade of mature oaks.

IMG_5473

I have seen many Trillium but never one with this coloration. I will check with Mimi at our April class to see if she knows the species or cultivar.

IMG_5493

There are still lots of camellias in bloom–this very large shrub had both of these flowers on it. I could not see a graft anywhere to indicate that one cultivar had been grafted onto another so this may be a sport (naturally occurring genetic variation.)

Ipheion uniflorum naturalizes readily under deciduous trees or shrubs if left undisturbed.

IMG_5482

IMG_5483

Filoli’s signature tulips beds are underplanted with Nemophila menziesii, commonly called baby blue eyes. Everything in the beds (this is just a small section above) is propagated for the season in Filoli’s greenhouses.

The potted tulips are coming out for us all to enjoy. There are hundreds more waiting their turn in the cold frames right outside our classroom door. On Thursday, March 16, the garden will stay open until 8 pm and there will be a lecture event entitled The Culture of Tulips. Go to http://www.filoli.org for more information or to register to attend.

Deciduous shrubs are less in favor in California than in other parts of the country so I was really pleased to see several Viburnum x burkwoodii in bloom and just starting to put on their new leaves. As you can see, the shrub itself, lower right, doesn’t look like much! The flowers are very fragrant and lovely in all stages of bloom.

I will stop now before you lose your patience! Good-bye Filoli–see you in April.

IMG_5396

In praise of spring blooming trees…

I readily admit that in my early gardening years I paid little attention to trees. In the suburban environments I have lived most lots were not large enough to accommodate more than a couple of mature trees and you just lived with whatever the city or your neighborhood developer planted.  Many trees were planted too close to the house or each other in an attempt to have a landscape look ‘mature’ way before its time. Over time these trees became hazards to foundations or plumbing or to each other and had to be removed. To this day I can call pitifully few common deciduous or evergreen trees immediately by name unless I have had personal experience with the tree species in question.

When we relocated in 1997 to Macon, GA I arrived in early April, a few weeks after my husband, and in the peak season of Georgia’s impressive array of spring blooming trees. Macon is home to the International Cherry Blossom Festival (not associated with the National Festival in Washington, DC) and boasts more than 350,000 Yoshino cherry trees. Other spring ornamental trees bursting into blossom included white and pink dogwoods (Cornus) of several species, purple leaf ornamental plums (Prunus), and lots of cultivars from the saucer and star magnolia families (Magnolia soulangeana and M. stellata.) All of these bloomed in Macon among a riotous backdrop of azaleas and late blooming camellias and surrounded by 100 foot tall pines and oaks. Pretty heady for a girl from “it never rains in Southern California” who gardened on a 5,000 square foot lot! My years in Macon living on a casually landscaped/quasi-wooded acre taught me a great deal about trees in general and gave me a special love for those trees whose explosion of blooms signal the coming of spring.

As with a few other posts recently I thought about this topic just a bit too long and found it challenging to find nice specimen trees in peak bloom to photograph. When you add to that the inherent pitfalls of taking pictures of trees on other gardeners’ properties without trespassing, getting a good shot without cars or overhead wires in the way, etc., etc. the venture became quite an adventure. Think of the movie Twister only I am trying to figure out where the bottom of the top of the tree I see in the distance is rather than chasing the tornado! And all that without a wing man…it is clear that iPhone photography is not my calling. Bear with the pictures and take a look at what I found blooming in Fresno in the last couple of days.

fullsizeoutput_99a

Some our earliest flowering trees are the Kawakamii pears, Pyrus kawakamii. These trees are very widely used as a residential tree in the Central Valley and are easily recognized by the bright granny apple green leaves and masses of white flowers as seen below. In contrast to other ornamental pears, the Kawakamii has a broad canopy with weeping branchlets. They mature to no more than about 25′ high and wide and as such can be used in groups on moderate sized lots.

fullsizeoutput_999

The Bradford pears, Pyrus calleryana ‘Bradford’, follow the Kawakamii pears closely in the parade of blossoms. The three you see below are planted on the small landscaped side strip of our corner lot.

img_5353

The smaller tree on the left was planted in 2008 as a 15 gallon just before we purchased the home and replaced one of the original three on this fence line. The two mature trees are about 17 years old. Blossoms on younger trees tend to be more a bright white and on mature trees, more cream colored. This tree puts its blooms on first, with the leaves breaking after the flowers are finished. The Bradford pear was the first variety of P. calleryana to be introduced and is probably one of the most overused and unreliable landscape trees planted. The species is pyramidical in nature with no central leaders and strongly vertical limbs. As the trees age the branching pattern spreads out, putting excessive strain on the crotch of the tree. This results in many Bradfords splitting in half or into thirds right at the crotch, leaving you with a mature but badly disfigured tree structure. As with most ornamental pears it is susceptible to the bacterial disease called fireblight which will cause varying amounts of summer dieback and cannot be controlled chemically. In a perfect world I would never plant Bradford pears but for us they are an invaluable source of backyard summer shade and hopefully no one will be parked under any of them when they decide come unglued (so to speak!)

img_5351
Beautiful spring show on a somewhat iffy tree!

img_5327

I pass these 6 striking trees at least once or twice on my daily travels. They are planted in the parking strip of a side yard which sits right on a busy thoroughfare. I have always loved the burgundy foliage found on all the flowering plums in the Prunus genus. There are many species from which to choose and, following my own advice that it never hurts to ask,  I knocked on the door of this house hoping the resident would know the species or cultivar when I decided to add one to my back garden as a focal point. Alas, no information was to be had on what I still perceive to be the perfect purple leafed plum, just right in size, habit and flower mass. I ended up choosing a Prunus cerasifera ‘Purple Pony’ (below)–mine has a LONG way to go to inspire the smile the pink explosion down the street gives me!

Even though the redbud blossoms are on the verge of breaking out, the trees still look pretty twiggy from a distance. There are a number of Cercis species grown in central California. Most are fairly small trees and they are often grown in rows or groups. They profit from a bit of light shade until acclimated to our hot summers. I have a young Cercis canadensis texensis ‘Oklahoma’ in my back garden but it has nary a bud on it yet. I am always amazed by the redbud-it seems one day to be almost invisible and the very next day turns into a riot of purplish pink flowers massed on every branch, twig and even the trunk. The redbud pictured below is one of a number grown along a major crosstown road. I’ll check back on this tree in another week or so when it is in full bloom.

Cultivars of both Magnolia x soulangeana and Magnolia stellata provide an abundance of late winter/early spring color in my community. Although you see a number of the evergreen magnolia such as the classic Southern magnolia, Magnolia grandiflora, in my part of California they traditionally suffered from the affects of our dry heat and lack of rain. These magnolias are just too large for the average residential lot and often end up overpruned and unloved after a few years of cleaning up the leaf litter and fighting the surface roots. The deciduous type magnolias, both those with saucer shaped flowers and those with star shaped flowers, are well loved here. There are many named cultivars of both M. x soulangeana and M. stellata and I feel confident that unless you are speaking about the one you planted (with a tag on it) most gardeners cannot tell one cultivar from another. I know I can’t!

The saucer magnolias, M. x soulangeana, are often erroneously called tulip trees because they bear masses of exceptionally large tulip shaped flowers. These flowers, most often shades of pink and pinky purple, gradually open to resemble large saucers. The bloom precedes the new leaves and in years of late frost can be lost or damaged by the cold. In their youth they can be shrubby and downright uninteresting looking when they are not blooming. This shrubbiness often misleads homeowners into planting the scrawny 5 gallon plant smack up against the house–a decision they will regret when the tree reaches its mature height of about 25-30 feet.

Here are two fairly young saucer magnolia trees. Notice the one on the left is about planted about 2 feet from the home’s foundation. img_5360

This one is quite mature. Below you can see a close up view of this trees blooms.

The star magnolias, M. stellata, are generally smaller in mature height and are often seen locally as multi-trunked large shrubs. While there are cultivars with pink flowers, the white flowered selections seem to be found here in greater numbers. As a species they are quite slow growers and, as with the saucer magnolias, not head turners unless in bloom. I found this lovely and quite large M. stellata used as a street tree on very wide residential street popular with bikers and walkers–a lovely vision up close.

All of these spring blooming beauties so far have been ornamentals. The San Joaquin Valley has thousands of acres of stone fruit and nut trees which produce an always changing sea of blooms for a couple of months each spring. Next year I’ll take you for ride along our Blossom Trail to see blooming trees for as far as the eye can see! I will close with my only offering of an actual fruiting tree. This charming dwarf nectarine greeted me as I  drove into my friend Ellen’s country driveway. I have been to her home dozens of times without taking notice of it. With its blooms just starting to pop out I had to jump out of the car to snap a photo. As with the redbuds, I’ll update you on its bloom power in a week or two!

img_5374

img_5375

I am heading to Filoli for my second A Year in the Garden class on Wednesday. It will be exciting to see if the daffodil bloom has reached its peak and to have a bit more time to stroll the gardens after class without an umbrella!

Winter whites…

Like a full moon on a dark night, these late winter whites light up my drowsy garden just as it starts to emerge from its winter nap…

img_5307

My Camellia japonica ‘Swan Lake’ has fewer blooms than previous years, possibly due to limited water, but this one is perfect!

img_5312

Chrysanthemum hosmariense, locally called Moroccan daisy, blooms over a long period with its most profuse flowering January through March.  Even though the warm weather slows the show down its fine, gray-green foliage makes a nice mound year round. Consistently pinching back the spent blossoms will give you a tidier look and keep the new flowers coming. I have mounds of this perennial in several locations with varying sun and moisture conditions and it has proven very adaptable.

img_5311

Hard to believe this is a winter bloomer for me! I have several mature colonies of common calla lilies, Zantedeschia aethiopica, but only a single clump that reliably blooms for me in winter. The others all look pretty bad by late fall and take a long winter’s rest before returning in the mid spring. I think the cultivar is ‘Hercules’ and, if so, it lives up to its name–the bright golden central spike is almost 4 inches in length. The tiny true flowers of the calla lily cover the spike, whose botanical name is the spadix. The creamy white which we think of as the flower is actually a spathe, a curved leaf modification.

I could not showcase winter whites without my favorite hellebores. As these were pass along plants many years ago from a gardening friend I can only say that I think they are H. orientalis. I grow  more than a dozen large clumps of these, all seedlings of the original plant, and I take care to keep them quite separate from my other hellebores to have the best chance of new seedlings retaining the clear white of the parent. The blooms hold up well as cut flowers and the glossy, dark green and leathery foliage is a great addition to a mixed bed or a mixed bouquet in the summer months.

Getting to the bottom of it…

Many woody perennials winter over more successfully if the previous year’s growth and bloom stalks are left intact through the cold weather.  Generally falling into this category are many of the salvias, echinacea, monarda, achillea, lantana, and buddleia. All of these can be pretty rangy or twiggy by their season’s end and it is hard for me to resist cleaning them up in the late fall just to make the garden’s overall appearance tidier. If trimmed back so late in the season that no new growth has long enough to harden off the plant is left with a plethora of twiggy hollow stems exposed to water by the cuts. Water will fill the hollow stems and can cause rotting down to the base of the plant. We don’t lose many of these plants in my mild winter garden to frost or bitter cold but many could be lost to overzealous fall cleanup! The natural die back of the current year’s growth acts as protective armor for the next year’s new growth.

So, when do you know the time is right to cut back? There is no one size fits all or date to mark on your calendar. As with all plant maintenance the first step is to know how the plant grows. Several of the plants listed above push their new leaves out at the soil level forming a clump of new growth at the base as the soil starts to warm up at winter’s end. Soil temperature is a better indicator of impending spring growth than air temperature. As you walk through your garden finishing up your rose and summer blooming shrub pruning be mindful of what’s going on at the base of your perennials. Today as I raced the rain to get the last of my four ‘Eden’ climbing roses pruned I surveyed a nearby bed and found these specimens giving me the heads up that it is time to tidy them up for the impending spring.

img_5316

Okay, so I had all ready trimmed a good many of last year’s stems from this Monarda didyma ‘Raspberry Wine’ (Bee Balm) before it occurred to me that this was a good topic for a post! You can clearly see the flurry of new rosettes of growth. The old growth was so ready to be gone that most of it just fell off at my touch.

img_5317

I decided to wait a few more days to trim back the old stems on this Salvia guaranitica ‘Black and Bloom’ as the very first of the new growth has just appeared.

img_5319

It’s cousin and neighbor, Salvia leucantha ‘Velour Pink’ was well on its way so I trimmed back all its spent stems.

img_5315

This Gaura lindheimeri is a relatively new bicolor called ‘Rosyjane’. It is a little more compact than the species but still looks better throughout the season with regular tidying up. This is the first winter for this cultivar in my garden and you can see the remains of the original top growth is about 1/3 the size of the new growth clump. I will carefully trim all of the old stems to just below the new growth or just wait another week or so and be able to gently pull them off.

There is no rocket science here–the first principle of readying woody perennials for spring is to walk your garden regularly and see what your plants are doing! Understand their growth habits and each will tell you in their own time when to clean them up in anticipation of a great new gardening year.

A Year in the Garden…Filoli in February

Filoli  is a fine example of an early 20th century country estate located in Woodside, about 30 miles south of San Francisco. The 654 acre estate is a National Trust for Historic Preservation site which was opened to the public in 1976 and features a 54,000 square foot home, more than 16,000 square feet of formal gardens, a six acre orchard and numerous marvelous open meadow and woodland spaces. They boast extensive educational offerings in horticulture, nature education, botanical art, the decorative arts, flower arranging and much more plus lecture series events and opportunities for nature hikes. Filoli is in its final year of a three year Centennial Celebration and has declared 2017 its Year of the Garden.

For the last several years they have offered an eight month horticultural certificate program called A Year in the Garden. Long on my bucket list, I declared 2017 MY year in this marvelous garden. This informative series of classes covers a broad range of topics from basic botany to water management and garden design. A huge perk for its students is that it is taught by Mimi Clarke who was a full time Filoli staff gardener for over ten years. Mimi now maintain gardens for a number of private clients but has not lost her love of Filoli and has a wealth of knowledge of the gardens and its plant material gained over her many seasons of stewardship of the grounds and its plantings.

In future posts I’ll tell you more about the history of Filoli and share with you more photos of both the home and grounds. The day of the first class meeting arrived with dark skies and a steady drizzle of rain which made both the almost 4 hour journey from my home and photography in the garden challenging.

Clad in our boots and raincoats, our group of fourteen was met in the Visitor and Education Center to be escorted behind the scenes to our classroom in the Potting Shed located near the estate’s original greenhouses. And a very nice potting shed it was…

img_5252

This lovely building was built in the last few years with funds donated by a generous Filoli benefactor and offered the perfect setting to begin our study, surrounded by the garden staff’s tools of their trade and with lovely views of both work in progress and the surrounding woodland.

Mimi Clarke gave us a short overview of the series and we all had the opportunity to introduce ourselves. Many of my fellow students characterized themselves as novice gardeners and their hopes for what they would gain from the class were as varied as their ages and hometowns. I think we’ll be a fun group and everyone will learn from each other’s experiences.  I was really excited to hear that most class days will have a nice balance of classroom work and hands on work in the garden or garden walks.

Our morning topic was part one of two lectures devoted to Basic Botany. No matter how many times I have heard these plant growth basics, I feel a little more empowered every time. So many of the decisions we make about how we choose, plant or prune individual  specimens should be based on basic knowledge of their root, stem and leaf structures and often, they are not. We just put them in the hole and hope for the best–often applying a one process fits all plants philosophy. We cut them back hoping to make them fit the size or shape we require without regard to their genetic disposition. We prune when it is convenient for us rather than the optimum time in the growth cycle of the plant. I can never hear these basics too often! I also appreciated Mimi’s concise explanation of botanic nomenclature and the importance of knowing your plants by their scientific names rather than their common or regional names. The printed material we received on botany basics and types of root, stem and leaf systems along with illustrations of leaf classifications is to the point and will be a good addition to my references.

After a quick lunch break we set out on our first garden exploration–the Landscape Tree and Shrub I.D. Walk.

As a quick diversion we first spent a few minutes learning about the literally hundreds (maybe thousands?) of potted up daffodils, tulips and foxgloves lined neatly in the yard area outside our potting shed classroom.

We learned that these pots are used not only for color in and around the patio and walkway areas of the garden but also placed in the beds to fill in gaps. Once each pot’s peak bloom has passed it is replaced with a new one whose bulbs were set in a bit later, thus extending the bloom season as long as possible. Spent daffodil bulbs are then planted in the outlying areas of the garden to provide color the next year. Spent tulip bulbs are composted as there is not enough winter chill to have them bloom from year to year in the ground.

With umbrellas up and a great handout relieving us from too much note taking Mimi led us through various parts of the property stopping at intervals to highlight trees and shrubs many of which are considered to be foundation plantings of the estate, meaning that the species was included, often in large groupings repeated throughout the grounds, in the estate’s early landscape design. Here is a small part of what we saw:

img_5258

This stately grove of Olea europaea ‘Mission’, or Mission olives, was planted around 1918 and is an original landscape feature. The Mission olive is native to California and was developed by Spanish missions in the late 1700s. The trees in winter have a soft cushion of oxalis underfoot and still bear fruit after almost 100 years!

img_5259

An allee of Plantanus x acerifolia, commonly called London plane trees, is an example of a stylized pruning technique called pollarding. If left to mature naturally, these deciduous trees would grow to 65-100 ft. tall with trunks more than 10 ft. in diameter. Pollarding produces the short, club-like branches you can clearly see in winter. As spring arrives long whips of new growth will leaf out to provide a shady canopy and a tree whose size is much more in keeping with the needs of the walkway. Growing against the building’s brick wall you can see the leafless trunks of a very large wisteria. Filoli has both Wisteria floribunda (Japanese wisteria) and Wisteria sinensis (Chinese wisteria) growing on many of its brick facades. Without a label it is impossible for me to tell which species this is until it leafs out and starts to flower. I’ll check back in on this one as the year progresses–it will be spectacular to photograph in bloom!

img_5246

Three species of camellias are prominent in the Filoli landscape: Camellia japonica, Camellia sasanqua and Camellia reticulate. Pictured are several cultivars of sasanqua camellias. Mrs. Roth, the second owner of the estate had a particular fondness for camellias and had them shipped in from all over the world. Many cultivars of Helleborus, commonly called Lenten Rose, carpet the shaded areas under the camellias. I especially liked this one which almost appeared striped from above.

img_5276

img_5273

This amazing specimen is Ulmus glabra ‘Camperdownii’, the Camperdown Elm. This cultivar is unable to reproduce from seed and is propagated from grafts. The wide canopy and contorted pendulous branches develop slowly over time, ultimately reaching up to 30′ high and wide. This Camperdown Elm was planted in 1918. These elms are very susceptible to Dutch Elm disease and thus are rare in world today, usually found on large old estates. In the background left you can see three of  the over 200 Taxus baccata ‘Stricta’ which are planted on the property. Cuttings for these Irish Yew trees were taken from Muckross, the Irish estate of Filoli’s original owners, Mr. and Mrs. William Bourn, II.

Our semi-sogginess did not dampened our enthusiasm as we finished our walk and gathered up our belongings for the day, looking forward to our next class in March.

img_5244

Daffodils lead the way each year in Filoli’s parade of blooms. Although I saw several blooming naturalized colonies my visit was just a bit too early to see them in their full glory. The estate’s annual event, Daffodil Daydreams, spans Friday, February 24-Sunday, February 26, and will feature talks, tours, demonstrations and hands-on activities all in celebration of this beautiful bulb whose blooms signals the coming of spring. If you would like more information about this event or anything else going on at Filoli go to their website: http://www.filoli.org

Over the fence…

Each gardener works her ground for different reasons. Some love the physical labor and breathing the fresh outside air. Some enjoy seeing their planning on paper come to life.  Some use their gardens to express their creative core and reveal themselves to others who view and enjoy the resulting beauty. Some just revel in the diverse plant world God has given us with which to work.

I am probably a little bit of each of those gardeners but most of all I am a social gardener. While it is true that most of us actually labor in our physical garden space alone, with the exception of spouses or children who are conscripted into service, there is so much “gardening” that goes on in the world around us bringing each of us into contact with others whose unique gifts, knowledge and experience enrich our lives. Enthusiasm is the catalyst for the movement of ideas among individuals who might never cross the other’s path if not for their shared passion. Enthusiasm is–by its very nature–SOCIAL.

In every city I have gardened I have made friends for whom the seed of our relationship was a shared love of our gardens. Those seeds grew to sturdy plants, blossoming into relationships that grew far beyond our gardens. I think back to my thirties and Mary C. who made many garden center trips with me trying to develop a steep, dry slope into a cottage (hillside cottage?) meadow. Her plant knowledge was far superior to mine and I learned so much from her! BFF Judi H. and I have toured, shopped, planned and planted together for more than 30 years even though we have not lived in the same city since 1997. Beautiful Mary S. introduced me to the wonders of her Southern woodland landscape and a host of plants I knew but had never grown. We traveled the back roads of Georgia to nurseries far and wide, took in classes and events at the Atlanta Botanical Gardens, celebrated our successes and bemoaned our failures for a decade. Karen B., also a Georgia girl, gardens in a relaxed style we all could take lessons from–she taught me that not every garden need be weed free and groomed to be a source of pleasure to those who inhabit it. It was always a joy to drive by her home and see her in her broad brimmed hat and gloves picking blueberries or a bloom or two to fill the glass wall vases in her kitchen.

As my Central Valley garden grows in years, so have I. Now in my sixties with gardening friends in their 60s, 70s and beyond, our gardening dreams may be loftier than our knees and backs can follow through on but our enthusiasm has not waned. Ellen H. has expanded my meager knowledge of local birds and their homes in my garden. Ann D. has taught me more about trees and wildflowers than I could have hoped to learn from a book. She has a keen scientific body of knowledge and is my go-to for native plant and wildlife information. We approach with chagrin our shared inheritance of gardens not well planted nor well tended by their previous owners. We exchange knowledge, ideas and plants ‘over the fence’ just as gardeners have done for centuries.

Please enjoy a few plantings from all of my gardens which came to me over the fence from cherished gardening friends.


Parting words to gardeners ‘over the fence’ everywhere.

fullsizeoutput_97f

Succulent dreams…

Succulents are everywhere! Long a staple in the schemes of gardens in mild winter and temperate summer locales such Southern California and the San Francisco Bay area I am seeing more and more creeping into the landscapes in my  San Joaquin Valley. Even the big box home improvement stores have copious supplies practically year-round. The growing interest in low water gardening has us all looking at plants with new eyes hoping they will be just the solution to our current challenges.

Four or five years ago I toured the San Francisco Decorator Showcase home, an event  held annually to benefit the city’s University High School.  That year’s home was a gorgeous 4 story, very early 20th century mansion not far from The Presidio and overlooking the Palace of Fine Arts and the San Francisco Bay. The landing just outside the home’s very formal front door was flanked by the first examples I had seen of what we now call ‘living walls’. These horizontal facades consist of generally metal frameworks to which are attached individual plant openings made from root retaining bags or boxes. Each opening is individually planted and when the plants fill out, a solid wall of green is established. In the intervening years since this first glimpse many different systems of this kind, in all manner of sizes and materials, have been developed and are readily available to home gardeners. These particular walls were planted entirely in succulents and were preceded, as you walked up the steps, by two extremely large bowl shaped urns planted with additional succulents, mostly having very bold natural structures. I was in love! The juxtaposition of the century old limestone home with all its turn of the century ornamentation and these modern and very statement making plantings was not only fun but also gave the home an upbeat, young, fresh look. Unfortunately the photos I took did not survive the transition from Blackberry and PC to iPhone and Mac and my vivid memory of the scene cannot be inserted as media into this post! I have spent time each of the ensuing years trying to come up with just the right combination of structure and succulents to add a semblance of these pleasing points of interest to my own garden world.

Research was my first task so, of course, I bought a book to add to my gardening reference library. It was lovely reading but ever so much more academic information than I needed fullsizeoutput_97d as I could really only buy whatever succulents are locally available and most of those are labeled only with the genus name or possibly just a common name. Wherein my book had descriptions of hundreds of Echeveria, many very different from one another, my ability to narrow down the labeled Echeveria at my local Home Depot to anything more specific was pretty pitiful. I abandoned my traditional desire to plan my plantings and keep detailed records and labels of everything and reduced my hunt to the lowest common denominator. I bought the smallest pots of as many different shapes and colors variations as I could find.  Now the learning curve began!

My first attempts were in rather shallow broad dishes which I set out on the patio tables around the pool. These bowls were lovely when planted in the late spring but as the summer set in I quickly learned the difference between succulents and cacti. Almost all cacti are succulents but all succulents are definitely NOT cacti. I fried the whole lot in short order. I suppose had I actually read my book rather than just looking at the photos I would have learned that many succulents are not very tolerant of strong sun. And again the meagerness of accurate labeling weighs in to make it a challenge to determine whether what you are purchasing is a cast iron performer or prefers its sun to be filtered.

Somewhat chastened by this experience I put my sumptuous succulent planter dreams away for the season. Not to be outdone by these pesky but perky plantlets in their 3″ pots I gave it a go the next year, keeping my bowls in bright light under the covered patio and was rewarded with plants that quickly outgrew their containers.  I transferred all of them to an empty concrete fountain, left by the home’s previous owner, which had enough fine cracks in it to make it unusable as a fountain but perfectly drained as a planter. Here you see that effort:

img_0140

Upon the initial transfer of the plants into the fountain the center was quite flat and uninteresting. Several days later Dave came across a display of tall rectangular plastic pots at Costco which were preplanted with a variety of succulents and brought one home on a whim.  We pulled out the smaller plants from the fountain’s center area and literally set the entire pot into the soil about 3″ so it would be stable. Height and importance were added instantly to the planting! The plastic planter remains in place as I write this some 3+ years later–a long term bang for our $12.99. Specimens have waxed and waned in the bowl through the seasons. I break off bits and tuck them in here and there. The fountain is sited in a morning sun only area and is protected enough to have avoided most loss from freezing winter cold.

Above you see a few bits from the bowl as it looked yesterday–overall a successful venture! I planted a second unused fountain in the front garden the next year. Sited in full southern sun it has been more challenging to keep going. It has become an “only the strong survive” site. I pop in a few new little pots each fall to give them the best chance of settling in and then it is up to them to hang on.  A couple of specimens have flourished in that area of searing sun, including this very structural pencil like selection and the pebble shaped blue green mat in the foreground. Sooner or later I’ll hit upon just the right ones to acclimate to the spot but it clearly is not happening in an organized fashion. You live–you stay, you die–oh, well!

img_5176

Because the ground freezes in the winter, local gardeners striving to maintain broad swathes of interesting succulents planted in the ground rather than pots face more challenges than our lucky gardening friends further south and in the more temperate Bay Area. Specimens need to be identified which can tolerate the proposed site in terms of summer sun and winter cold. I know I’ll be seeing many fine examples of these gardens as I travel south for the spring tours and I’ll post as many photos as I can. Let me tease you with a bit of the front garden pictured below. These photos were taken in Pasadena the first week of December. The low slung historic Spanish bungalow is a charming backdrop for a front garden chock full of mature succulent specimens and other unthirsty selections. Its charm was equal to any white picket fenced English garden I’ve seen.

2017–Best garden year yet!

I have been writing this encouragement on the January page of my calendar for more years than I can remember! Gardeners are by nature hopeful people with full faith that each new year will bring them garden miracles in abundance. This will be the year my soil, after many seasons of amending and turning over, will reach its peak friability and provide all the nutrients my plants require to perform their best. This will be the year perennial selections added in the last couple of seasons, having slept a year and crept a year, will leap with abandon. This will be the year the aphids will find my neighbors’ crape myrtles more hospitable than mine. This will be the year of a world wide snail and slug extinction event…

img_5164

For the first time since Thanksgiving I have spent a bit of time in my garden assessing what needs to be done and reflecting on changes I would like to make this year. We have had an incredibly wet and quite cold last 6 weeks. At this midpoint mark in January we have had almost 10″ of rain since October with over 4″ of that in the last 2 weeks. These numbers will not sound like much to gardeners in other parts of the country but here in the Central Valley of California our average annual rainfall (July 1-June 30 being our rain year) rarely exceeds 11″. We are in a historic 6 year drought in an area whose best rain years would constitute emergency conditions for residents in states blessed with naturally wetter weather. We have prayed for rain and now, of course, don’t know what to do with all this water!

Don’t misunderstand me–I am excited to have the low areas of my dormant lawn look vaguely like weedy duck ponds. The water will eventually soak in and give me a little better start when the heat comes. What we really need is more snowfall in the upper elevations of the Rocky and Sierra Mountains. The spring melt of the mountain snowpack is the source of most of the water which fills the California  reservoirs and carries us through the summer–many parts of this state receive zero rainfall from May through October. So it is more than likely that even this very wet winter will not change any of our water restrictions, residential or agricultural, and we will continue learning how to live in this new normal world of lawn free landscapes and unthirsty plantings. Of the 4 areas from which we removed lawn in 2016 two have been replanted and are prospering, one remains untouched and has a lovely covering of bright green winter annual weeds and the last is about 3/4 renovated. We were only about 5 feet from having all the tilling and amending done on that bed when my sweet Dave got out his big, bad axe to remove an especially large root adjacent to the driveway. Unfortunately there was a labyrinth of unseen sprinkler pipe under the root and well…you know the rest of the story. When the water finally drains out of the very large trench he had to dig to make the repair we will be back on the road to completion–look for pics of this very large bed in a future post.

So everything looked pretty much as I would expect at this time of year. It’s time to start pruning the roses. The weeping standard ‘Renae’ roses in the front are so top heavy I fear they may crack at their grafts and the climbers on the pavilion trellis have gone mad! My roses have always been incredibly forgiving and even in years when I feel as though I have just hacked at them they have rewarded me with wonderful bloom seasons–maybe they are ever hopeful that they will get a new gardener who knows what she is doing!

img_5158

This time last year one of my planned changes was to remove this row of Prunus laurocerasus, common cherry laurels, which grow behind the pavilion in a very narrow bed up against our side fence. These fast growing evergreens are prolific reseeders and have to be constantly pruned to keep them out of the canopy of mature Bradford pears growing on the other side of the fence. I only got as far as cutting them down to bare trunks last spring. Even these plants have forgiven me and offered me another chance to decide in their favor. Hmmm…

img_5161

Through heat, drought, rain and wind this rosemary soldiers on. It looks exactly the same now as it did in 110 degree weather with no water last July. The tag on this warrior said Rosmarinus officinalis ‘Prostratus’, commonly know as creeping or prostrate rosemary. Last summer I cut it back by half and it did not even blink. It is about waist high now and clearly not prostrate. In the ground now for almost 6 years and yet to produce even a single  blue flower. I am hoping that 2017 will be its year!

I’ll continue to keep you updated on what is happening in my garden and I have many fun garden road trips planned that you are invited to come along with me through posts and photos. The Mary Lou Heard Garden Tour in Southern California is back on my calendar this year after a few years absence. I also hope to do at least 3 of the Garden Conservancy’s Open Days this year: LA, Marin County and San Jose. I am looking forward to seeing the offerings on this year’s Gamble Garden Spring Tour. I am very excited to be participating in the Garden Bloggers Fling being held in the Washington DC/Virginia area in late June. I will have the opportunity to tour a number of public and private gardens over several days and get to meet garden bloggers from all parts of the country. I also hope to bring all of you along to a series of classes I am taking at Filoli in Woodside. If you are unfamiliar with Filoli now is the time to check them out at http://www.filoli.org –you will be amazed. There are 16 acres of formal gardens as part of a large country estate established in the early 20th century, a lovely historic home and a full schedule of garden events and education. I will participate in their A Year in the Garden program which includes classroom instruction and hands on experiences in a wide range of horticultural topics. It is always fun to meet gardeners from other areas–no matter the differences in climate or growing conditions we all speak the same language of excitement, enthusiasm and hope that THIS will be our garden’s best year yet!

img_5155
Every winter’s enduring promise–the Hellebores are almost open!