No calendar needed…

…to know that it is Thanksgiving week! Every year my tall bearded iris ‘Frequent Flyer’ bursts back into bloom to mark the season.

IMG_5058

‘Frequent Flyer’ has been touted as one of the best repeat-blooming Iris germanica for mild winter gardens. Introduced in 1994, this pure white selection has beards tipped with lemon yellow and is wonderfully fragrant.


IMG_5057

A single division from my front garden colony was transplanted in this sweet spot in the back garden in the fall of 2014–too many stalks and buds to count two years later!

IS IT HAPPINESS THAT MAKES US THANKFUL,

OR IS IT THANKFULLNESS THAT MAKES US HAPPY?


A plant in need of PR…

There are few genera of plants whose ‘thug’ species are reviled by the ornamental gardening world to the extent that their far less common but far more polite cousins are virtually overlooked. Every gardener, even ones who just mow their lawns and take a glance at their beds and borders now and then, knows the highly invasive and almost impossible to eradicate weed called oxalis. Oxalis corniculata is also referred to as  yellow oxalis, yellow wood sorrel or possibly four letter words of your choice; truly for most of us just the word oxalis says it all. This perennial menace thrives in sun and shade all over the western states (and beyond, I’m sure!) Its small 5 petaled yellow blooms are followed by elongated seed pods which can propel seeds up to 6 feet. Once the seeds germinate, forming a shallow taproot, a knitted network of roots quickly develops and it is on the move. For every one you hand pull, hundreds of seeds are dispersed in the process. Along with its partner in crime–spotted spurge–it is one of few weeds which merit herbicides especially made for its control.

Several years ago we started to see highly decorative oxalis species, mostly from South Africa and Mexico, more prominently in the retail trade. The shamrock plants sold in March for St. Patrick’s Day and the so-called Candy Cane plant seen around Christmas time are examples of oxalis which have found a niche on the plant scene and are primarily left in their pots probably due to unease about invasiveness. I have more than once pulled myself away from the gorgeous maroon foliage of Oxalis triangularis not quite believing the claim that it remains quite compact.

And so…it was truly a leap of faith for me to purchase a little 3″ pot of Oxalis hirta a few  years ago on a plant shopping trip to Southern California. Even having read its Sunset Western Garden Book description which painted a picture of restraint my little one spent its first full year in a pot! Oxalis hirta, native to South Africa, emerges in the late fall from small bulbs. Short stalks shoot up and feathery green leaves follow. Literature describes these stalks as about a foot tall but mine never top 6-8″. A bright rose pink flower eventually tops each stalk.

IMG_5051

Gaining a small measure of confidence that this pretty baby was not the kudzu of the west in disguise, I transplanted several handful of the diminutive bulbs into beds here and there. I passed on a few to a friend who, being no gardening fool, raised her eyebrows when I told her they were from the genus oxalis and promptly planted them in a pot on her patio for safety’s sake.

Oxalis hirta will continue flowering until heat sets in again and then the colony goes dormant for the summer.  This makes it a perfect little bulb to have planted among other plants which die back in the winter. They are a fun surprise in the garden when all else is shutting down for the season. Although the bulbs do naturalize, the colonies are very tight. Below you see the first few coming up on the left in an area covered through the summer with Geranium h. ‘Tiny Monster’. A second colony (seen on the right) will eventually be covered by low Cistus (Rockrose) that was planted to mask the bare legs of the background roses. I will spade these out in 2017 as they start their summer’s rest and move them forward in the bed.

The whorled flower buds seen below in the side view of this colony are your horticultural clue to this plant’s membership in the oxalis family.

IMG_5047


I see this little gem as a plant in need of a PR professional and a Facebook page. At the very least it needs a common name which eventually might allow folks to forget that it is an oxalis and give it a chance!

The other yuletide…

I have written in other posts about the great love of camellias I developed during the almost dozen years I lived in Georgia. The neighborhood in which I lived started developing in the 1920s as a sort of suburban alternative to downtown living. Although only a mile or so from downtown it was on the other side of the river–literally–and removed from the business hustle and bustle.  Homes on large wooded lots (some up to 5 acres but most in the 3/4 to 1-1/2 acre range) were built through the next several decades resulting in a residential area with many unique homes of varying architectural styles and surrounding grounds both formally and informally landscaped. In the 40s and 50s the Shirley Hills neighborhood was home to many serious horticultural hobbyists and a few homes still have the large glass greenhouses which marked that era. Camellia breeding was very popular during this time and the legacy of that pursuit remains today in hundreds of mature camellias, many 15+ feet in height. It is not uncommon to see very large plants which have a variety of grafts, dating from decades ago, producing a number of different cultivars of different flower color and form. The wide variety of camellias grown results in a very long bloom season starting in October (earliest blooming Camellia sasanqua varieties) through April (latest blooming Camellia japonica varieties) and offering a riot of pink, reds and whites along with striped and mottled blossoms.

An early blooming favorite in Shirley Hills, just as it is in the Central Valley of California, is Camellia sasanqua ‘Yuletide’. As a side note: in Georgia only Camellia japonica are commonly referred to as camellias–pronounced “ca-may-ya”. Camellia sasanqua, which often bloom earlier, have smaller leaves and less showy flowers, are simply called sasanquas. ‘Yuletide’ is an upright shrub with small dark green leaves and medium sized single coral red flowers sporting bright yellow stamens. Its name implies that it will be blooming at Christmas time although mine always came into bloom by late October and typically were finished by mid December.

Last year I added a Camellia sasanqua to a small partially shaded area visible from our back patio. My other 12 in ground camellias grow in a narrow side bed along our western property line.  We attach shade cloth panels from the roof to the fence during the hottest months to prevent them from burning. While they grow very successfully there and bloom profusely in February, March and April they are only visible from windows in our hall bath and master bedroom! In my quest for a smaller scale fall/winter bloomer to fill this shady spot with some color I found the other ‘Yuletide’ and this little darling has just started to come into bloom.

This is Camellia sasanqua ‘MonDel’ which is being grown and sold by Monrovia Nurseries under the name ‘Pink-A-Boo’. ‘Pink-A-Boo’ is a sport of the Yuletide camellia. The term sport refers to a naturally occurring genetic mutation of a plant. ‘Pink-A-Boo’ is indistinguishable to the eye from ‘Yuletide’ with the exception of its clear medium pink flower color. A sport  may produce a plant with  mottled foliage or flowers,  leaf color different from its parent or flowers sized or carried differently. The key is that the new characteristic has not been engineered by man but by nature. Sports are eagerly anticipated  by gardeners–who wouldn’t want to have the only plant of its kind? To be a success commercially a sport must be able to hand down its unique traits to its offspring.

I love the way these blooms open! The half open bowl shape is just as attractive as the fully opened flower and the bloom’s fragrance is equal to if not more lovely than ‘Yuletide’. I try to clip a few blooms every few days to float in a bowl in my kitchen. This tidy camellia would make a lovely hedge or espalier with its glossy dark green leaves all year and the bonus of the blooms in early winter!

Keep your eye on the crown…

The crown of a plant is where the roots join the stem. Most plants grow best when the crown is planted just at the soil level.  There are plants which prefer to sit a few inches below the soil level such as the clematis and plants which prefer to be a bit above the soil as they are particularly susceptible to rot in damp conditions.

Many herbaceous perennials grow by forming multiple stems/leaves around the base (crown) of the plant. Examples of this growth habit can be seen on shasta daisies, hostas, rudbeckias and asters. Throughout the growing season and especially as we head into the fall; what’s going on at the crown tells you when to get out your clippers!

Perennials have very specific growth cycles throughout their season unlike annuals. Annuals typically are almost ready to bloom when you put them in and bloom continuously until they are replaced with new ones for the next season. As perennials live in your garden year-round they need a rest every now and then. That rest doesn’t necessarily coincide with the change of season. Throughout the spring, summer and fall periodic deadheading of the flowers and trimming back of foliage can encourage new growth and perhaps more bloom periods. This is especially true in mild winter regions like mine where perennials aren’t automatically forced into dormancy by freezing cold or snow.

New growth at the crown of herbaceous perennials is your signal that it is time to trim back existing foliage and flowers, freeing up all the plant’s energy to put on new leaves, stems and flowers. In my garden the asters are perfect examples of this principal. While traditionally a fall flowering species, my asters pop their heads up in early spring and are huge sprawling masses by mid summer. They get tired looking and sometimes a bit bug eaten and, as their growth habit is to continue to branch out layering each new flowering stem at the last set of flowers, an individual stem may be 4-6 feet long but only blooming toward the tips. Remember this photo from earlier in the year:

IMG_3983

This single plant ends up laying all over whatever is underneath it and the huge rock behind it. I gather up the stems periodically to take a peek ant the base of the plant.  When  a flurry of new foliage at the crown has begun to show I know it is time to cut back the older stems, flowers and all. It is often heart wrenching! About 3 weeks ago I headed the whole plant back-clipping off each stem individually rather than just grabbing at the base and whacking (my usual M.O.) in hopes of not damaging the new basal growth. Below you see the same plant with a nice healthy basal clump and several new long flowering stems starting the whole cycle again.

img_5012

The columbine at the front of the long shade bed provides another example. I am not sure I have showed you Aquilegia x cerulean ‘Origami Blue and White’ before so here’s a look at early spring:

These sweet girls not only regrow from the same crown yearly but also throw a good bit of seed so when the original plants finally die out I have plenty of others to move around! They tend toward mildew on their foliage as the fall approaches. The spent foliage will fall to one side a bit and in the upper part of the photo you can just see the new leaves emerging from the crown:

img_5017

The oldest of the leaves will all pull off easily revealing the new foliage. These are early spring bloomers for me so I will not have encouraged any new flowers by removing the oldest foliage but they will be a bit tidied up while they rest.

img_5008

Just like everything in nature–one size does not fit all here! Only mild to temperate winter gardeners will want to use these techniques this late in the year. Gardeners with freezing winters, with or without snow, do not want to push any new growth so close to winter and generally leave on the stems of herbaceous and woody perennials to protect the crown from rot–doing their major clean up in spring.

Our mild fall continues and a few things in the garden are thinking it is spring! I have narcissus leaves a foot tall and these fun things are blooming:

2016 Salvia update…

As I write today it is a cool 64 degrees with overcast skies.  We have had several lovely days as the result of a “Pacific trough”, whatever that is. Our temps will climb as the week progresses but I think we have hope of an actual transition to fall with nothing in the forecast over 88 degrees!

Last week I shared a little of my annual autumn reset routine for my garden. In addition to the cleaning up and cutting back I like to take stock of how the new plants to the garden have done through their first summer. I added many new salvias in the early spring, some of which I shared photos in my May 26th post. Although some have been less successful than others I lost only one for which there was no hope of return. I planted a leafy and flower filled Salvia ‘Heatwave Brilliance’ in a sunny spot near a large south facing rock to add a bit of color to an otherwise fairly sterile area. The snail social media must have blown up with the news–I can envision the Twitter handle @newfood! just lighting up the screens on all their teeny, tiny smartphones. The NEXT DAY I went out to poke in its newly made label and the foot tall and wide plant had been reduced to 6 or 8 totally naked stems and even those stems had been chewed down…OMG. This casualty was the only salvia snail activity I saw all summer. I could almost see a little banner declaring Go Big or Go Home! waving over the wretched remains of a plant so recently set that my trowel was still  pushed into the ground next to it.

The new salvias were planted in areas ranging from morning sun/afternoon partial shade  to  full day southern sun. Limited water was in play for all but clearly those planted in the baking sun had consistently drier soil.

img_4958

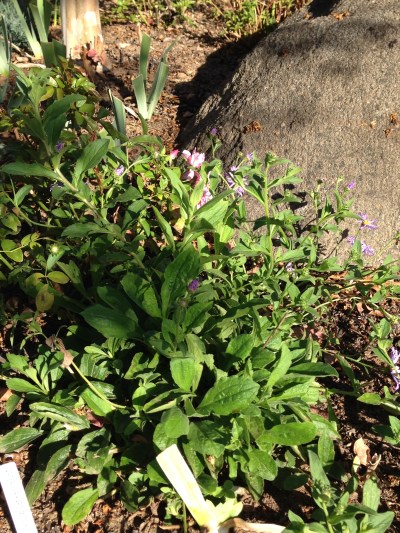
In this photo there are four salvias from foreground to background: Salvia greggii ‘Raspberry’, Salvia microphylla ‘La Trinidad Pink’, Salvia ‘Heatwave Blaze’ and Salvia ‘Heatwave Glare’. You can barely see ‘Heatwave Glare’ (white) at the edge of the picture. This bed has morning sun until about noon and then is gradually shaded by the house as the sun moves to the west. The foliage is still fresh and green and they are fairly compact. While none of them is covered with flowers, the flowers are quite lovely both from a wide view and close up. I do have ‘Heatwave Blaze’ staked with a low half hoop just behind the edging as anything that might stray into the field of the string trimmer is doomed. Can’t say much for the lawn, can you? Here’s a little closer view of ‘Heatwave Glare’ and ‘Heatwave Blaze’.

This bed, which curves around into a more sunny area, also contains several varieties of campanula and hardy geranium, dianthus, cuphea, hellebores, calla lilies, penstemon, iris and roses has been a great success this year with a nice succession of flowering from spring until now.

img_4967

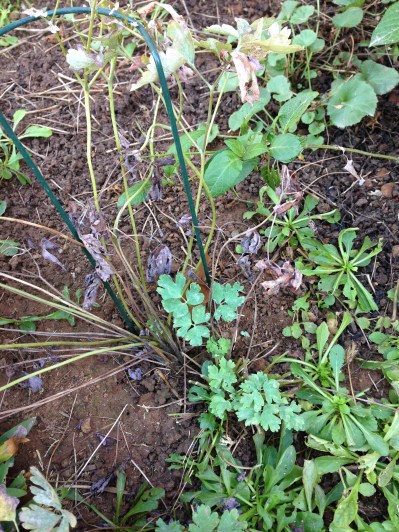
In sharp contrast, this bed sits just in front of the shade canopy of a large sequoia and is in full southern sun all day. There are four salvias in the bed although only 3 are visible in the photo. Left to right they are: Salvia x jamensis ‘Shell Dancer’, Salvia microphylla ‘Ultra Violet’ and Salvia ‘Heatwave Glimmer’. ‘Shell Dancer’ is quite tall with lovely bicolor flowers. ‘Ultra Violet’ is a naturally shorter cultivar at about 12″-18″.  All three are leggy and look pretty beaten down. They will definitely get their trimming back to see if I can stimulate some fresh new growth and blooms in this slightly cooler weather.

I have long believed that many plants recommended for full sun cannot withstand our Central Valley scorching summer afternoons so it would be an easy leap to think that based on my garden these salvias will not meet my needs for full sun perennials. All of these featured today are from the greggii-microphylla complex of salvias which are native to the dry deserts of Mexico and have proven adaptability to harsh climates. I think the word ‘adaptable’ is key here. My morning sun/afternoon partial shade bed probably is closer to the greenhouse/commercial nursery conditions in which they were propagated and grown than to their native habitat. It is also important to remember whenever you add plants which are characterized as waterwise or drought tolerant that usually the words ‘when established’ are included. I’m willing to wait them out for one or two more seasons in hopes their performance in the full sun and drier areas will improve with time as they become acclimated to their planting locations.

These two are in conditions about midway between protected and extreme and have done nicely. On the left is Salvia ‘Fancy Dancer’ and to its right is Salvia greggii ‘Dark Dancer’. ‘Fancy Dancer’ sports the same bicolor pink blooms as ‘Shell Dancer’ but on a more compact plant. ‘Dark Dancer’ is quite tall at about 30″ and is uncharacteristically unfloppy for a salvia that tall. Is unfloppy a word?

img_4991

Salvia ‘Mystic Blue Spires’ has been a winner for a first year plant! At about 24″ tall and wide this single plant has bloomed continuously since I dug it in. I have deadheaded the flowers as they faded but done no trimming of the plant otherwise.  Wilt on the hot days has been minimal considering it has had barely 4 months to establish its root system.  It is a bee, butterfly and hummingbird magnet. I love the bold color and plan to add a few more of these if I can find them this fall.

While not new in 2016 these two deserve a mention. Salvia melissodora, often called Grape Scented Sage, on the left is one that garden literature deems “challenging to grow outside its native habitat of Northern Mexico.” I planted a 4″ pot in an area of the garden we commonly refer to as the ‘death zone’–hot, hot, hot and dry, dry, dry. The little guy struggled for the first year then started to settle in gradually over the last 2. I now have a lovely 4′ plant which blooms sporadically throughout the year. The pale lavender clusters of grape scented blossoms are not spectacular but the plants soft green foliage looks pretty  good year around and will provide a nice backdrop if I can ever get anything else to grow in its corner of doom. On the right is an little guy with huge pink blooms (in relation to the plant’s overall size) which was an unmarked nursery find last fall. Its foliage indicates it is probably from that greggii-microphylla complex. It is encouraging that after a winter to settle in it looks much better than its newly planted cousins sharing a similarly hot southern exposure.

img_4986

I’ll close with this snap of a bud forming on one of the Salvia ‘Coral Nymph’ plants which have been so popular with the bees and hummers this year. This cultivar is usually sold as an annual though I have had some winter over successfully each year. As I was photographing other salvias for this post I noticed the bud color variegation, then quickly saw that all the buds were similar. I have grown this cultivar for over 20 years and never noticed the interesting bud. Sometimes we spend our garden hours looking at the big picture, creating  swathes of color, designing vignettes of foliage with contrasting color or texture or arranging plants to provide views at varying heights and forget to look closely at the very plants we are using. This bud reminded me to spend a little more time getting to know the amazing details that nature provides us if we just look closely enough.

Autumn–ready, reset, go…

The months of September and October are typically times where EVERY day could be a gardening day if the weather has cooled off enough to allow it.  A well attended autumn garden results in a garden with far less necessary spring work.  It is a lot more fun to put plans you have made over the winter into action as soon as early spring breaks than it is to know that there are days of yard clean-up required before you can put trowel to the ground with new plant material.

Thursday and Friday were beautiful days to get started on my autumn bed to-dos. With not much sun and highs in the 70s, I made tremendous strides in the smallish garden beds which flank my front walk and the broad curved border on the west side of the yard. The word ‘reset’ is defined as ‘to set again or anew’, in other words to go back to the beginning — affording the chance to move forward again.

By early fall, woody perennials–especially those which thrive in hot and dry conditions–have become brambled, twiggy masses. The iris need dividing plus a foliage trim back and the long suffering roses are starting to show spider mite and heat damage. Because I garden in a temperate winter area, the autumn cut back or clean up often results in one more round of fresh foliage and blooms. The new leaves have a chance to harden off before the possibility of frost looms and I have reduced the size of the plant enough to be more manageable through the winter.  In the case of the woody perennials and the roses, the cut back requires the discipline to cut off perfectly good flowers and foliage for the reward of extending the bloom season a bit. For the woody perennials such as lantana, some salvias, rosemary and lavender you avoid that inevitable mess of a hard freeze reducing a huge plant to a soggy mess. Many of the woodies have hollow stems. If you prune them back AFTER the cold has arrived the hollow stem tends to accumulate water and a hard freeze will then decimate your plant. A bonus for me in my snail ridden beds is that the cleaning up and clearing out exposes the bases of the large rocks where snails winter over and I have the opportunity to bait heavily one more time (less effective when the beds are lush and the dirt mostly covered with plant masses.)

Gardening guides instruct you to dig and divide bearded iris after they bloom, typically in mid-July. Our long growing season and unmercifully hot summer make that timetable challenging. In areas of longer winter many bearded iris (even those categorized as ‘early’) do not even start to bloom until mid-May. I frequently have my early varieties blooming in mid-February and those classified as late bloomers totally finished by mid-May. My remondant (repeat blooming) varieties bloom all fall, winter and early spring then rest in the summer. With blooms finished by June the foliage looks pretty ratty all summer! I dig and divide in the fall giving the divisions a chance to settle in through the mild winter. The iris seem to end up last on my list and I always have at least one area that I let go too many years and then lose the whole group.

img00158-20120423-1420

img00160-20120423-1423
Bearded Iris in better years!

The last few years of significantly more restricted outdoor watering has diminished my once pretty spectacular colonies of iris. I am hanging in there for better times and knowing that iris are fairly resilient through drought times gives me hope!

The photos below will show you that the woody salvias have been reduced in size by about 2/3rds, the roses deadheaded with diseased foliage removed, the aster sprays cut back to the new foliage emerging from soil, the iris cleaned up and trimmed and all the spurge and oxalis dug up. I rescued some great iris out from under the pale blue plumbago and replanted them in more open areas.

I finish each bed/border section by spreading both Preen for pre-emergent weed control and snail bait. I am undecided about winter annuals at this point but know that the beds are ready for them if I want to add any. Over the next couple of weeks I’ll work every section of both the front and back gardens in this fashion. Once everything is done I will order a load of fine mulch and top dress each area. Late in November I’ll strip the rose foliage to nudge them into dormancy, following up with the hard pruning in late January.

A quick update on our grass removal project–the large driveway circle bed is almost empty of it current plants. Digging is more than challenging due to the roots of the two mature and very large crape myrtle trees. Today, we were able to till and clear about 25% of  the area which used to have lawn, adjusting the grade a bit as we worked. I will focus on larger scale evergreen shrubbery on the street side–possible Wheeler’s Dwarf Pittosporum en masse. The west exposure may get a swathe of tough mounding drift type roses and the shady north side is still a mystery to me!

The two smaller areas from which we removed grass are doing really well! I love the vibrancy of the Double Pink Knockout roses underplanted with lavender lantana. The combo has withstood the summer heat quite well with only moderate water. With the upcoming cooler weather allowing the plants to really tuck in well I am cautiously confident of success. You can see this little bit in the lower left photo of the four above. The second area got a ‘Natchez’ crape myrtle which has given us a few worrisome days after we put it in the ground on the day that was 109! About 3 weeks ago I underplanted the tree with Convolvulus mauritanicus ‘Moroccan Blue’ and they are doing really well. I’ll keep all y’all posted on the progress of all these grass-free endeavors!

IMG_2672

The Renae tree roses are loving this bit of cooler weather and are putting on sprays of beautiful new pink flowers. They will get just a bit of clean up before the spring but I am letting them do their thing for now!

Around Londontown… wrapping up

I will admit to a little disappointment in Central London as far as front gardens go. Very little green–mostly beautiful historic rowhouses and buildings with only sidewalks, intricate ironwork, steps and great front doors. Where there was a wee courtyard in front it was generally being used as a car park. I had photographed what I thought were some great looking boxwood hedges and columns and then got closer to them and realized they were artificial–amazingly common even in Kensington where a half million pounds will buy you a garrett.  Where I did see large hanging baskets from light posts they were often a mixture of real and artificial! The best window box and hanging basket displays I saw were on the pubs and restaurants.

img_4237
Chelsea restaurant had doors on both sides of the corner done up beautifully!
img_4298
Classic green and white carried the day in this shady postage stamp front garden

img_4904

img_4792
A small bed is big enough for varying textures, colors and foliage forms
img_4340
Another great living display on a restaurant door
img_4850
Good-bye from the Southwark Borough Market–thanks for traveling with me!

A garden out of the ashes…

Our last day in London was cold and windy–I packed my umbrella around but we never had any rain to speak of. There were a few more sights on Dave’s list so we headed out for the Westminster Borough to marvel at the Parliament buildings, Big Ben, the London Eye and Trafalgar Square. My guy has a thing for big bronze lions so the Square was a must see!

The last garden visit on this trip will be more of a history lesson than a feast of huge trees, billowing shrubs and masses of flowers. We decided to walk back to our hotel from the St. Paul’s Cathedral area, took a wrong turn–as I had left our best map in the room–and came upon the Noble Street Gardens. Noble Street is only one long block nestled between two tall buildings and closed to car traffic. There are two very different green space experiences in the that single block. The first is the Noble Street Walkway.

NOBLE STREET WALKWAY

Over 1,000 Roman soldiers, housed in a stone fort built in 110 AD, worked for the provincial governor of London. Ninety years later, Roman construction workers began to build the first City Wall using more than one million blocks of ragstone shipped from Kent in over 1,750 boatloads. This massive defensive stone wall stretched almost 3 miles from Blackfriars in the west to where the Tower of London now stands in the east.

By the 14th century, the City Wall had been strengthened by towers to the west adding to the Late Roman towers to the east. The Roman City Wall set the shape of the city of London for the next 1600 years. Throughout those centuries workers continued to maintain it, using various building techniques. The parish churches, religious houses and street layout were firmly established throughout the Medieval and Tudor periods and–although London grew beyond the City Wall it remained a defensive barrier.

Fast forward several hundred years–when German bombing raids in 1940 destroyed the area, the City Wall was revealed once again. For more than 20 years the area remained undeveloped allowing archaeologists to identify the site of the Roman Fort for the first time. A new road, London Wall Road, was constructed in 1956 as the city emerged from the ruins. New developments have been designed to enhance the area’s historic core.

The Noble Street Walkway was created to allow the City Wall remains to be seen by the public. Descriptive plaques (from which the above story was taken) tell the tale of the remains. The area was intentionally landscaped and is maintained in a manner to not detract from the ruins. A gentleman I met on the walkway works in the adjacent building and told me that the area is heavily planted with naturalizing bulbs and is stunning in the early spring. Right now it has only a green carpet with some vines climbing the ruins but is an amazing sight–knowing you are looking at Roman ruins  and a city that rose from the ashes of WWII.

img_4758
City Wall ruins spring to life!
img_4756
View of the northern end

THE GARDEN OF ST. ANNE AND ST. AGNES CHURCH

This garden welcomes you as you step off the Noble Street Walkway. The garden is laid out on the remains of the Medieval church’s graveyard. The church itself was restored by Sir Christopher Wren after it was damaged in the 1666 Great Fire of London. The modern design aims to provide the attractive red brick church with a pleasant and welcoming setting. As with every church garden I visited many folks rested and lunched on the benches. These green spaces throughout the city are welcome respite from concrete and stone.

img_4759

img_4782
A restful gray, green and white palette prevails

Evergreen shrubs rule at St. Anne and St. Agnes Church garden. I identified viburnum, piers, mahonia, hebe, boxwood, aralia and many more. There are only two higher maintenance beds like the one above. All together this short block in the middle of the bustling financial district had a lot of offer.

My time in this wonderful city has come to an end. I’ll wrap up in the next fews days–after we are settled back at home. I think I’ll call it “Around Londontown…” and will post the best photos of  doorway gardens and windowbox  from the neighborhoods I walked. Until then…

Some Not so Secret Gardens of London…

This is Dave’s last workday at his conference and tomorrow we will do our last bits of sightseeing together. Today I set out to find a few small gardens that are off the beaten track and not in the tourist guides. After three very warm days at the beginning of the week today is cold and windy with a good amount of drizzle. My pink umbrella and I hop on the bus to St. Paul’s Cathedral with the printout from TimeOut London, a publication focusing on the obscure but wonderful things to see and do in the city. As I walk toward my first destination I see a wonderful garden right in front of me smack in the middle of the financial district which is pretty much tall buildings and cement.

CHRISTCHURCH GREYFRIARS GARDEN

This garden covers the burial grounds on the site of the former nave of Christchurch Greyfriars which was taken over by the Corporation of London in 1931. The ruins of the church’s wall form a spectacular backdrop for this simple but very lush garden. The rose garden was laid out in 1989 and is designed to match the floorpans of the former Wren Church. The central flagstone paved aisle is flanked on either side by box hedged beds which represent the original position of the pews. The structures which support climbing roses and clematis are copies of the wooden surrounds which decorated the original stone pillars.

img_4709

img_4724

img_4714

img_4729

The palette is restrained and the pinks, blues and purples are set off by lots of rich green foliage and a number of silver leafed plants. The beds are not rigidly planted but organized in drifts which mound and merge. In addition to the roses, butterfly bush, agapanthus and penstemon pictured above the beds overflowed with hydrangeas, daylilies, rockrose, abelia, lamb’s ear and bearded iris. While some of these were not in bloom it was obvious that the garden is tended with loving hands. Everything was healthy and green and well dead-headed. Christchurch Greyfriars Garden was as close to perfect as one could get to my personal gardening aesthetic. I am so glad I stumbled over it!

POSTMAN’S PARK

This garden was opened in 1880 and is made up of the churchyards of St. Leonards, Foster Lane, St. Botolph, Aldergate and the graveyard of Christchurch, Newgate. It is home to the famous Watts Memorial, built in 1900 as  tribute to heroic men, women and children who lost their lives coming to the aid of others. The ceramic plaques are attached to a building side and protected by a tiled roof.  Benches provide a spot for quiet reflection. The plant materials in this park sheltered by buildings on all sides were not particularly interesting or in good condition but I would not have missed these unique ceramic plaques created by artist G. F. Watts for the world. The deaths memorialized date back to the 1860s and the most recent I saw was 2007.

img_4733

img_4734

RED CROSS GARDEN

The weather having cleared up a little I decided to cross the River Thames in search of this garden–its story was so compelling! A short bus ride dropped me off at the based of London Bridge and I walked a few blocks to Red Cross Way and the site of the Red Cross Building in the 1800s. The base of the London Bridge is dominated by the Southwark Cathedral and as I was trying to figure out which way to go I had a bird’s eye view of the cathedral’s gorgeous herb garden–see that next!

Red Cross Garden was part of London social reformer Octavia Hill’s pioneering social housing scheme, which consisted of two rows of Tudor revivalist cottages and a community hall. The garden predates the buildings and was laid out in 1887 and was created to “provide an open air sitting room for the tired inhabitants of Southwark”. The garden in its present form includes benches, a pond and very small bandstand in addition to lawn and curving beds. A larger, newer covered area has been added and the garden is promoted as a location for small weddings. The cottages form the backdrop for the garden and they are occupied as rentals. They are tiny, tiny, tiny! The front doors can be not more than 2 feet wide. There is a small circle of lawn with a sign indicating that it is a ‘Whisper Lawn’, meaning to advise visitors to be respectful of the cottages’ residents.

img_4814

img_4820

img_4823
Gorgeous palette of pink, white and silver!

img_4819

SOUTHWARK CATHEDRAL HERB GARDEN

What else can I say–beautifully executed. The greens glow against the cathedral’s stone walls.

img_4808

UP NEXT: A Garden Out of the Ashes

Mr. and Mrs. Shakespeare…

After enjoying the charms of three Cotswold villages, my tour group journeys further north to Stratford-upon-Avon. Our guide, David, takes time to tell us a bit about himself.  He is Welsh born, a former BBC reporter and producer and the father of seven grown children. He and his wife live 6 months of the year in Tampa, Florida; 3 months in Paris; then 3 months in London. He shares that they sold their large Central London home several years ago and gave the proceeds to their children to purchase their own homes. He has a child in each of the three cities and so he and his wife rotate through as semi-permanent houseguests!

On our ride we also learn about Shakespeare’s early life and his marriage to Anne Hathaway when he was 18 and she was 26. We will first see Anne Hathaway’s Cottage and Gardens. This is her parents’ home in which she was raised along with her younger siblings. There is supposition that the late age at which she married was due to the loss of both her parents and her responsibility in raising the family’s younger children. The cottage is located in the hamlet of Shottery which was once several miles from Stratford-upon-Avon but now is surrounded by the community of about 20,000. In England, to be a village you must have both a post office and at least one pub.  If you lack either, you are a hamlet! In the area close to Anne Hathaway’s Cottage there are many homes with thatched roofs, both straw thatch and water reed thatch. David tells us the historic thatched roofs in England are protected and thus when the homes need re-roofing it must be identical to the historic roof–very costly but a requirement. Just before we turn in to our destination he points out two newly built homes with elaborate water reed thatched roofs. The homes have been built in the medieval style and I could not have picked them out as new builds on my own.

The Cottage was built beginning in the 1400s (Elizabethan period) but much of what can be seen today dates from the 1600s. The land slopes quite a bit and thus the house has many interior levels. It would have been considered a farmhouse but one can presume that because it is quite large, having 12 rooms, that her family was quite well-off.  The property remained in the Hathaway family until 1892 when it was purchased by the Shakespeare Trust for preservation.

The gardens behind the Cottage were quite lovely but I imagine they would rise to the level of spectacular in the spring.  Take a look.

img_4648

img_4657

This fanciful woven willow moon art piece was a gift to the Shakespeare Trust and installed in the garden only a couple of years ago. It pays homage to the use of willow throughout the grounds, including two living willow bench covers. You can see one of these at the end of the path in the picture on the right of the second row. It is trimmed back annually but you can see on the left side (sunny side) the willows have sprouted lots of new whips!

Onward into central Stratford-Upon-Avon! Our last destination, Shakespeare’s Birthplace, is quite built up as a tourist attraction with many shops and restaurants. You enter through the Shakespeare Centre which is a lovely exhibit showing how the Bard has been enjoyed and interpreted through the centuries. I especially liked a series of art pieces by a various of artists in different mediums. Here are a few of my favorites:

The Shakespeare Centre leads you out into the garden where you can dally a while or walk the path to the medieval house which also served as a place of business for Shakespeare’s father, a successful glove maker. These gardens, as others I have seen on this trip, look wonderful for the time of year but undoubtedly would be more lush and colorful in the spring.

img_4687

The gardens at Shakespeare’s Birthplace had a formal layout but many informal plantings within the beds. There were no low rigid boxwoods hedges and lots of loose blowsy drifts of autumn flowers such as goldenrod and asters.  I loved the willow gardener just above who appears to be tending this very large and upright fuchsia.

The kitchen garden had a number of bearing fruit trees in addition to medicinal herbs, veggies and other edibles.

The front side of Shakespeare’s Birthplace faces a street redesigned for pedestrians only. Quite fun to just stroll down and back  even though it was quite crowded. The villages’s library is on this wide lane and there were many school children in and out and also gathered at the outside tables and chairs of the eateries. I sat for a few minutes and just watched life go by!

UP NEXT: Some Not so Secret Gardens of London